next.js アプリの初期化( npx create-next-app@latest <アプリ名> ) または pnpm create next-app@latest <アプリ名> または bun create next-app <アプリ名> )
next.js の 並列ルート(Parallel Routes)
並列ルート(Parallel Routes)
通常のJSX配置
export default function Layout({ children }) {
  return (
    <>
      <Sidebar />
      {children}
      <Modal />
    </>
  )
}
Parallel Routes での配置
export default function Layout({ children, sidebar, modal }) {
  return (
    <>
      {sidebar}
      {children}
      {modal}
    </>
  )
}
後者では app/@sidebar/page.tsx や app/@modal/page.tsx が独立してレンダリングされ、URLに応じて切り替わります
Parallel Routes で URL に応じて sidebar/children/modal を切り替えるサンプル
以下は @sidebar と @modal スロットを使い、URL によって切り替える最小構成の例です。
フォルダ構成
app/
  layout.tsx
  page.tsx
  @sidebar/
    layout.tsx
    page.tsx
    default.tsx
  @modal/
    default.tsx
    photo/
      [id]/
        page.tsx
  dashboard/
    layout.tsx
    page.tsx
  photo/
    [id]/
      page.tsx
各ファイルの内容
app/layout.tsx
export default function Layout({ children, sidebar, modal }: {
  children: React.ReactNode
  sidebar: React.ReactNode
  modal: React.ReactNode
}) {
  return (
    <>
      {sidebar}
      <main>{children}</main>
      {modal}
    </>
  )
}
app/page.tsx
export default function HomePage() {
  return <p>Home</p>
}
app/@sidebar/layout.tsx
export default function SidebarLayout({ children }: { children: React.ReactNode }) {
  return <aside>{children}</aside>
}
app/@sidebar/page.tsx
export default function SidebarPage() {
  return <nav>Sidebar Nav</nav>
}
app/@sidebar/default.tsx
export default function SidebarDefault() {
  return <nav>Sidebar Default</nav>
}
app/@modal/default.tsx
export default function ModalDefault() {
  return null
}
app/@modal/photo/[id]/page.tsx
export default function PhotoModalPage({ params }: { params: { id: string } }) {
  return <div>Photo Modal: {params.id}</div>
}
app/dashboard/page.tsx
export default function DashboardPage() {
  return <p>Dashboard</p>
}
app/photo/[id]/page.tsx
export default function PhotoPage({ params }: { params: { id: string } }) {
  return <p>Photo Page: {params.id}</p>
}
URL ごとのレンダリング結果
| URL | children | sidebar | modal |
|---|---|---|---|
/ | Home | Sidebar Nav | null |
/dashboard | Dashboard | Sidebar Nav | null |
/photo/123 | Photo Page: 123 | Sidebar Nav | null |
/dashboard(Intercepted) | Dashboard | Sidebar Nav | Photo Modal: 123(Intercepted) |
Intercepting Routes でモーダルを表示する例
app/dashboard/@modal/(..)photo/[id]/page.tsx を配置すると、/dashboard で /photo/123 をインターセプトしてモーダル表示できます 1 。
Notes
- Parallel Routes は App Router 専用です。Pages Router では利用できません。
default.tsxはスロットに対応するページがないときのフォールバックです 2 。- 実際のテスト例では
sidebarprop を受け取る Layout が実装されています 3 。
Citations
File: docs/01-app/03-api-reference/03-file-conventions/intercepting-routes.mdx (L58-66)
### Modals

Intercepting Routes can be used together with [Parallel Routes](/docs/app/api-reference/file-conventions/parallel-routes) to create modals. This allows you to solve common challenges when building modals, such as:

- Making the modal content **shareable through a URL**.
- **Preserving context** when the page is refreshed, instead of closing the modal.
- **Closing the modal on backwards navigation** rather than going to the previous route.
- **Reopening the modal on forwards navigation**.
File: test/e2e/app-dir/parallel-routes-and-interception/app/parallel-side-bar/layout.tsx (L4-9)
export default function Layout({
  children,
  sidebar,
}: {
  children: React.ReactNode
  sidebar: React.ReactNode
next.js で ビルド中を判別する
● next.js で ビルド中を判別する
if ( process.env.NEXT_PHASE === 'phase-production-build' ){
    console.log( '● ビルド中です!' );
}
https://github.com/vercel/next.js/blob/633e2749/packages/next/src/shared/lib/constants.ts#L70-L86
next.js で hydration error が起きる可能性があるものを調べる。
Next.jsのHydration Errorが起きる可能性があるものを包括的にリストアップします。
1. ブラウザAPI関連
Window/Document オブジェクト
window.innerWidth/window.innerHeightwindow.outerWidth/window.outerHeightwindow.scrollX/window.scrollYwindow.pageXOffset/window.pageYOffsetwindow.screen.width/window.screen.heightwindow.screen.availWidth/window.screen.availHeightwindow.devicePixelRatiowindow.location.*(href, pathname, search, hash等)window.history.*window.navigator.*(userAgent, language, onLine等)document.documentElement.clientWidth/clientHeightdocument.body.*document.cookiedocument.referrerdocument.getElementById()などのDOM参照
ストレージAPI
localStorage.getItem()sessionStorage.getItem()indexedDB
メディアクエリ
window.matchMedia('(prefers-color-scheme: dark)')window.matchMedia('(min-width: 768px)')- その他全てのメディアクエリ
その他のブラウザAPI
navigator.geolocationnavigator.mediaDevicesnavigator.bluetoothnavigator.clipboardnavigator.credentialsNotificationAPIIntersectionObserverResizeObserverMutationObserverPerformanceObserverrequestAnimationFramerequestIdleCallback
2. 日付・時刻関連
new Date()(現在時刻)Date.now()performance.now()- タイムゾーン依存の処理 (
Intl.DateTimeFormatの結果) new Date().getTimezoneOffset()- サーバーとクライアントで時刻がズレている場合の全ての日時表示
3. ランダム値・一意な値
Math.random()crypto.randomUUID()crypto.getRandomValues()- ランダムに生成されるID
- タイムスタンプベースの一意なID (サーバーとクライアントで異なる時刻)
4. ユーザー固有の情報
- ログイン状態 (クライアントで判定する場合)
- ユーザー設定 (localStorageから取得)
- Cookie情報 (document.cookieで取得)
- セッション情報
- 認証トークン
5. CSS/スタイル関連
getComputedStyle()element.offsetWidth/offsetHeightelement.clientWidth/clientHeightelement.scrollWidth/scrollHeightelement.getBoundingClientRect()- CSS-in-JSでのクライアント依存の値
6. 環境・設定関連
- ダークモード/ライトモードの検出
- システムの言語設定
- システムのタイムゾーン
- ブラウザの言語設定 (
navigator.language) - オンライン/オフライン状態 (
navigator.onLine) - バッテリー情報 (
navigator.getBattery()) - デバイスの向き (
screen.orientation) - タッチデバイス判定 (
'ontouchstart' in window)
7. サードパーティライブラリ
- クライアントサイドのみで動作するライブラリ
- ブラウザAPIに依存するライブラリ
- 動的インポートのタイミング
8. コンポーネントライフサイクル
useEffect内で初期化した状態を初回レンダリングで使用useStateの初期値に関数を使い、その中でブラウザAPIを呼び出しuseMemo/useCallback内でのブラウザAPI使用
9. 条件分岐
typeof window !== 'undefined'での条件分岐後の出力process.env.NODE_ENVに基づく条件分岐(一部のケース)- ユーザーエージェントによる条件分岐
10. その他
- Web Workers
- Service Workers
- WebSocket接続状態
- WebRTC
- Canvas/WebGL (動的生成される内容)
contentEditable要素の内容- フォーム要素の値(制御されていない場合)
- サーバーとクライアントでのReactバージョンの違い
- 外部スクリプトによるDOM操作
- ブラウザ拡張機能によるDOM変更
安全な対処パターン
// ❌ 危険: 直接使用
const Component = () => {
  return <div>{window.innerWidth}</div>
}

// ✅ 安全: useEffectで初期化
const Component = () => {
  const [width, setWidth] = useState<number | null>(null)

  useEffect(() => {
    setWidth(window.innerWidth)
  }, [])

  return <div>{width ?? 'Loading...'}</div>
}

// ✅ 安全: dynamic import with ssr: false
const ClientOnlyComponent = dynamic(
  () => import('./ClientComponent'),
  { ssr: false }
)
これらを意識することでHydration Errorを防ぐことができます。
tailwind を使わないUIコンポーネント Mantine をインストールする
pnpm install @mantine/core @mantine/hooks
pnpm install --save-dev postcss postcss-preset-mantine postcss-simple-vars
src/providers.tsx
"use client";

import { MantineProvider } from "@mantine/core";
import type { FC, ReactNode } from "react";

type Props = {
  children: ReactNode;
};

export const Providers: FC<Props> = ({ children }) => {
  return (
    <MantineProvider defaultColorScheme="light">{children}</MantineProvider>
  );
};
postcss.config.mjs
/** @type {import('postcss-load-config').Config} */
const config = {
  plugins: {
    'postcss-preset-mantine': {},
    'postcss-simple-vars': {
      variables: {
        'mantine-breakpoint-xs': '36em',
        'mantine-breakpoint-sm': '48em',
        'mantine-breakpoint-md': '62em',
        'mantine-breakpoint-lg': '75em',
        'mantine-breakpoint-xl': '88em',
      },
    },
  },
};

export default config;
src/components/UserMenu.tsx
"use client";

import { Button, Menu } from "@mantine/core";

export function UserMenu() {
  return (
    <Menu shadow="md" width={200}>
      <Menu.Target>
        <Button>Toggle menu</Button>
      </Menu.Target>

      <Menu.Dropdown>
        <Menu.Label>Application</Menu.Label>
        <Menu.Item>Settings</Menu.Item>
        <Menu.Item>Messages</Menu.Item>
        <Menu.Item>Gallery</Menu.Item>
        <Menu.Divider />
        <Menu.Label>Danger zone</Menu.Label>
        <Menu.Item color="red">Delete my account</Menu.Item>
      </Menu.Dropdown>
    </Menu>
  );
}
Next.jsでFirebase Analyticsを使う
Next.jsにFirebaseアナリティクス(Google Analytics)を追加するには、 クライアントサイドでFirebase Analyticsを初期化し、必要に応じてイベント計測を行うようにします
手順概要
- Firebaseプロジェクト作成・設定
- Firebase SDK依存パッケージのインストール
- 環境変数でFirebase設定情報を管理
- クライアントコンポーネントでAnalytics初期化
- カスタムイベントの記録
1. Firebaseプロジェクト作成
- Firebaseコンソールで新規プロジェクトを作成し、Google Analyticsの設定を有効化します。
- プロジェクトの「設定」→「全般」→「マイアプリ」から
measurementIdを含む構成情報を取得します。
2. Firebase SDKのインストール
npm install firebase
3. Next.jsファイルの作成
.env.local`
NEXT_PUBLIC_FIREBASE_API_KEY=xxx
NEXT_PUBLIC_FIREBASE_AUTH_DOMAIN=xxx
NEXT_PUBLIC_FIREBASE_PROJECT_ID=xxx
NEXT_PUBLIC_FIREBASE_STORAGE_BUCKET=xxx
NEXT_PUBLIC_FIREBASE_MESSAGING_SENDER_ID=xxx
NEXT_PUBLIC_FIREBASE_APP_ID=xxx
NEXT_PUBLIC_FIREBASE_MEASUREMENT_ID=xxx
src/common/firebase/firebaseConfig.ts
import type { Analytics } from "firebase/analytics";
import { getAnalytics, isSupported } from "firebase/analytics";
import type { FirebaseApp } from "firebase/app";
import { getApps, initializeApp } from "firebase/app";

const firebaseConfig = {
  apiKey: process.env.NEXT_PUBLIC_FIREBASE_API_KEY,
  authDomain: process.env.NEXT_PUBLIC_FIREBASE_AUTH_DOMAIN,
  projectId: process.env.NEXT_PUBLIC_FIREBASE_PROJECT_ID,
  storageBucket: process.env.NEXT_PUBLIC_FIREBASE_STORAGE_BUCKET,
  messagingSenderId: process.env.NEXT_PUBLIC_FIREBASE_MESSAGING_SENDER_ID,
  appId: process.env.NEXT_PUBLIC_FIREBASE_APP_ID,
  measurementId: process.env.NEXT_PUBLIC_FIREBASE_MEASUREMENT_ID,
};

// Firebase アプリの初期化(既に初期化されている場合は既存のものを使用)
export const app: FirebaseApp =
  getApps().length === 0 ? initializeApp(firebaseConfig) : getApps()[0];

// Analytics シングルトンインスタンス
let analyticsInstance: Analytics | null = null;
let analyticsInitialized = false;

// Analytics の初期化(内部的に1度だけ実行)
const initializeAnalytics = async (): Promise<void> => {
  if (analyticsInitialized) return;

  if (typeof window !== "undefined" && (await isSupported())) {
    analyticsInstance = getAnalytics(app);
    analyticsInitialized = true;
  } else {
    analyticsInitialized = true; // 失敗しても再試行しない
  }
};

// Analytics インスタンスを取得(常に同じインスタンスを返す)
export const getFirebaseAnalytics = (): Analytics | null => {
  return analyticsInstance;
};

// アプリ起動時に自動初期化
if (typeof window !== "undefined") {
  initializeAnalytics();
}
AnalyticsProvider.tsx
"use client";

import { logEvent } from "firebase/analytics";
import { usePathname } from "next/navigation";
import { type ReactNode, useEffect } from "react";
import { getFirebaseAnalytics } from "@/common/firebase/firebaseConfig";

type AnalyticsProviderProps = {
  children: ReactNode;
};

export const AnalyticsProvider = ({ children }: AnalyticsProviderProps) => {
  const pathname = usePathname();

  // pathname変更時にpage_viewイベントを送信
  useEffect(() => {
    const analytics = getFirebaseAnalytics();
    if (analytics) {
      logEvent(analytics, "page_view", {
        page_path: pathname,
      });
    }
  }, [pathname]);

  return <>{children}</>;
};
src/app/providers.tsx
"use client";

import type { FC, ReactNode } from "react";
import { AnalyticsProvider } from "@/common/firebase/AnalyticsProvider";

type Props = {
  children: ReactNode;
};

export const Providers: FC<Props> = ({ children }) => {
  return (
    <AnalyticsProvider>
      {children}
    </AnalyticsProvider>
  );
};
呼び出し方
src/app/layout.tsx で以下のようにして呼び出します。
<Providers>{children}</Providers>
これだけでページ遷移時に自動的にGoogleアナリティクスに送信されます。
# イベントの送信方法
useLogEvent.ts
"use client";

import { logEvent as firebaseLogEvent } from "firebase/analytics";
import { getFirebaseAnalytics } from "@/common/firebase/firebaseConfig";

export const useLogEvent = () => {
  const logEvent = (
    eventName: string,
    eventParams?: Record<string, string | number | boolean>,
  ) => {
    const analytics = getFirebaseAnalytics();
    if (analytics) {
      firebaseLogEvent(analytics, eventName, eventParams);
    }
  };

  return { logEvent };
};
const { logEvent } = useLogEvent();
// バリデーションエラー時の処理
logEvent("任意のイベント名", {
    // 任意のオブジェクト
});
logEvent の公式イベントにはどういう種類があるか
Google Analyticsの公式イベントについて、カテゴリ別に説明します。
アプリ一般向け
- app_open: アプリが起動されたとき(バックグラウンドから復帰も含む)
- screen_view: 新しい画面やページが表示されたとき
- select_content: ユーザーがコンテンツを選択したとき(記事、動画、商品など)
- user_engagement: ユーザーがアプリをアクティブに使用している時間を測定
eコマース向け
- add_to_cart: 商品がカートに追加されたとき
- add_to_wishlist: 商品がウィッシュリストに追加されたとき
- begin_checkout: チェックアウトプロセスが開始されたとき
- purchase: 購入が完了したとき
- refund: 返金が処理されたとき
- view_item: 商品の詳細ページが表示されたとき
- view_item_list: 商品リスト(カテゴリページ、検索結果など)が表示されたとき
- view_cart: カートページが表示されたとき
ゲームアプリ向け
- level_start: ゲームのレベルが開始されたとき
- level_end: ゲームのレベルが終了したとき
- level_up: プレイヤーがレベルアップしたとき
- unlock_achievement: 実績・アチーブメントが解除されたとき
- earn_virtual_currency: 仮想通貨(コイン、ジェムなど)を獲得したとき
- spend_virtual_currency: 仮想通貨を使用したとき
- post_score: スコアが投稿されたとき
アクション・認証
- login: ユーザーがログインしたとき
- sign_up: 新規ユーザーが登録したとき
- share: コンテンツが共有されたとき(SNSシェアなど)
- join_group: ユーザーがグループに参加したとき
パフォーマンス・設定
- tutorial_begin: チュートリアルが開始されたとき
- tutorial_complete: チュートリアルが完了したとき
- ad_impression: 広告が表示されたとき
補足: これらの公式イベントを使用することで、Google Analyticsでの標準レポートが自動的に機能し、他のアプリとの比較も可能になります。
ローカルでFirebase (Google) アナリティクスの送信をデバッグする
https://chromewebstore.google.com/detail/google-analytics-debugger/jnkmfdileelhofjcijamephohjechhna
DebugViewの表示手順
Google Analytics 4(GA4)の管理画面にログインします。
左下の「管理」をクリックします。
「プロパティ」列から「データの表示」を探し、「DebugView」を選択します。
DebugViewの画面が起動し、左側に過去30分のイベントタイムライン、右側に各イベントの詳細情報が見られます。
● Core Web Vitalsを取得してFirebase Analyticsに送信する。
https://dev.classmethod.jp/articles/classmethod-study-meeting-osaka-react-core-web-vital/
https://nextjs.org/learn/seo/web-performance
Core Web Vitals指標一覧
Next.jsのuseReportWebVitalsフックで取得できる指標は以下の通りです。
| 指標名 | 正式名称 | 説明 | 測定内容 | |
|---|---|---|---|---|
| LCP | Largest Contentful Paint | 最大のコンテンツ要素が描画されるまでの時間 | メインコンテンツの読み込み速度 | |
| INP | Interaction to Next Paint | 操作から次の描画までの時間 | 全体的なインタラクティブ性 | 2 |
| CLS | Cumulative Layout Shift | ページの視覚的安定性 | レイアウトのずれの累積値 | |
| FID | First Input Delay | ユーザーの最初の操作に対する応答時間 | インタラクティブ性(非推奨、INPに置き換え) | |
| TTFB | Time to First Byte | サーバーからの最初のバイト受信までの時間 | ネットワークリクエストの応答速度 | |
| FCP | First Contentful Paint | 最初のコンテンツが画面に描画されるまでの時間 | ページの初期レンダリング速度 |
実装詳細
next.js ondemand ISR のキャッシュの場所
● next.js ondemand ISR のキャッシュファイル保存場所
1. キャッシュファイルの保存場所
オンデマンドISRのキャッシュファイルは、FileSystemCacheクラスのgetFilePathメソッドによって決定されます。 next.js:450-471
キャッシュの種類によって、以下のように保存されます:
Fetchキャッシュ →
.next/cache/fetch-cacheディレクトリに保存されます。ページキャッシュ →
.next/server/appディレクトリに保存されます。
具体的には
・HTMLファイル: `{key}.html`
・RSCデータ: `{key}.rsc`(PPR有効時は`{key}.prefetch.rsc`)
・メタデータ: `{key}.meta`
・セグメントデータ: `{key}.rsc.segments/{segmentPath}.rsc.segment` next.js:379-434
App Routeキャッシュ
.next/server/appディレクトリに保存されます。
Pagesルーターのキャッシュ
.next/server/pagesディレクトリに保存されます。
なお、キャッシュの場所はnext.config.jsのcacheHandlerオプションでカスタマイズ可能です。
2. ローカル開発サーバーではISR のキャッシュファイルは作成されない
ローカル開発サーバー(next dev)と本番ビルド(next build + next start)では、ISRキャッシュの動作とファイル生成に重要な違いがあります。
2-1 . HTMLファイルの生成
- 本番環境では、静的にレンダリングされたページに対して.htmlファイルが生成されます。
- 開発環境では、HTMLファイルは生成されません。代わりに、リクエストごとにオンデマンドでレンダリングされます。
2-2 . ファイル構造
本番ビルド時に生成されるファイル構造は各ルートに対して以下のファイルが生成されます:
.html - HTMLコンテンツ
.rsc - React Server Componentペイロード
設定なしで SSR対応できる高速css in js ! linaria を使ってみる
● 1. linaria のインストール
npm install @linaria/core @linaria/react
npm install next-with-linaria
● 2. Next.js設定(next.config.ts)
import type { NextConfig } from "next";
import withLinaria from "next-with-linaria";

const nextConfig: NextConfig = {
  /* config options here */
};

export default withLinaria(nextConfig);
● コンポーネントで使用する
なんと、SSR自動で対応できます。
"use client";

import { css } from "@linaria/core";
import type { FC } from "react";

export const ClientComponent: FC = () => {
  return <div className={clientStyle}>ClientComponent</div>;
};

const clientStyle = css`
    background-color: lightgray;
    border: 1px solid gray;
`;
SSRの時は以下のようなCSSとして読み込まれます。
<link rel="stylesheet" href="/_next/static/chunks/%5Broot-of-the-server%5D__9aee51b5._.css" data-precedence="next_static/chunks/[root-of-the-server]__9aee51b5._.css"/>
● animationは css の中に記述する
const containerClass = css`
  position: relative;
  top: 0;
  left: 0;
  width: 100%;
  height: 100%;
  border-radius: 4px;
  animation: skeleton 1.5s infinite ease-in-out;

  @keyframes skeleton {
    0%, 100% {
      background-color: #f6f6f6;
    }
    50% {
      background-color: #f3f3f3;
    }
  }
`;
● 動的スタイリング styled のみ使用可能です。
・動的スタイリングは styled のみ使用可能です。
const Title = styled.h1`
  font-family: ${families.serif};
`;
・styledではなく css で使いたい場合は、動的スタイルだけ style に逃す✅ のが良いでしょう
・もしくはcss変数を使います(微妙かな..)
https://github.com/callstack/linaria/blob/master/docs/DYNAMIC_STYLES.md
import React from 'react';
import { css } from '@linaria/core';

const box = css`
  height: var(--box-size);
  width: var(--box-size);
`;

export function Box({ size }) {
  return (
    <div
      className={box}
      style={{ '--box-size': size }}
    />
  );
}
Next.js 14 → 15 へのアップグレード時に考慮すべきこと
● Next.js 14 → 15 へのアップグレード時に考慮すべきことをまとめました( with AI )
Next.js 15.x 完全変更点まとめ
Next.js 14からNext.js 15への移行を検討している方向けに、Next.js 15.xの全バージョンの変更点を網羅的にまとめました。
📋 概要
リリース日程
- Next.js 15.0: 2024年10月21日(安定版)
- Next.js 15.1: 2024年12月10日
- Next.js 15.2: 2025年2月26日
- Next.js 15.3: 2025年4月9日
- Next.js 15.4: 2025年7月14日
- Next.js 15.5: 2025年8月18日
🔧 Next.js 15.0(メジャーリリース)
主要な変更点
React 19 サポート
- App RouterでReact 19 RCをサポート
- Pages RouterでReact 18との後方互換性を維持
- React Compilerの実験的サポート追加
破壊的変更(Breaking Changes)
1. 非同期リクエストAPI
cookies()、headers()、params が非同期化
// Before
const cookieStore = cookies()
const token = cookieStore.get('token')

// After
const cookieStore = await cookies()
const token = cookieStore.get('token')
2. キャッシュセマンティクスの変更
fetch リクエスト、GET Route Handler、クライアントナビゲーションがデフォルトでキャッシュされない
3. その他の破壊的変更
- NextRequestのgeoとipプロパティが削除
- @next/font パッケージが削除(next/fontに統合)
- Speed Insightsの自動計測が削除
新機能
Turbopack(開発環境で安定版)
開発環境でのTurbopackが安定版としてリリース
after() API(安定版)
レスポンス完了後にタスクを実行するAPIが安定版に
import { after } from 'next/server'

export default function Layout({ children }) {
  after(() => {
    // ログ記録、分析などの二次的タスク
    log()
  })
  return children
}
Static Route Indicator
開発中にルートが静的か動的かを視覚的に表示
その他の機能
- React Compilerの実験的サポート
- onRequestError フックによる改善されたエラー監視
- ハイドレーションエラーメッセージの改善
アップグレード方法
# 自動アップグレードCLI
npx @next/codemod@canary upgrade latest

# 手動アップグレード
npm install next@latest react@rc react-dom@rc
🔧 Next.js 15.1
主要な変更点
React 19(安定版)サポート
Pages RouterとApp Routerの両方でReact 19の安定版をサポート
after() API の安定化
セルフホストNext.jsサーバーのサポート改善、Server ActionsとRoute Handlersでの runtime API サポート
エラーデバッグの改善
ソースマップの改善、ignoreListプロパティの実装によりアプリケーションコードに焦点を当てた表示
実験的認証API
unauthorized と forbidden API の実験的サポート追加
import { unauthorized } from 'next/server'

export function GET() {
  const user = getUser()
  if (!user) {
    unauthorized()
  }
  return Response.json({ user })
}
🔧 Next.js 15.2
主要な変更点
メタデータ生成の改善
generateMetadata完了前に初期UIを送信可能に(ボットは除く)
Turbopackのパフォーマンス向上
最大57.6%のコンパイル時間短縮、30%のメモリ使用量削減
エラーオーバーレイのUI刷新
新デザインのエラーメッセージ、React owner stacksによる高精度エラー報告
実験的Node.js Middleware
Middlewareでの Node.js ランタイムサポート(実験的)
その他の機能
- 開発サーバーでの統合デバッガ情報表示
- React View Transitions APIの実験的サポート
- create-next-appに--api フラグ追加
🔧 Next.js 15.3
主要な変更点
Turbopack for builds(アルファ版)
99.3%の統合テストが通る本番ビルドでのTurbopackサポート
パフォーマンス向上 CPUコア数に応じたスケールアップ: 4コア28%、16コア60%、30コア83%高速化
next build --turbopack
Turbopack設定の変更
experimental.turbo から turbopack キーに移動
const nextConfig = {
  turbopack: {
    rules: {
      '*.svg': {
        loaders: ['@svgr/webpack'],
        as: '*.js',
      },
    },
  },
}
クライアント計測フック
instrumentation-client.js|ts でフロントエンドコード実行前の監視設定が可能
ナビゲーションフック
onNavigate と useLinkStatus の追加
// onNavigate
<Link href="/page" onNavigate={(url) => {
  console.log('Navigating to:', url)
}}>
  Link
</Link>

// useLinkStatus
function MyComponent() {
  const { pending } = useLinkStatus()
  return <div>{pending ? 'Loading...' : 'Ready'}</div>
}
TypeScript プラグインの改善
大規模コードベースでの60%のレスポンス時間改善、フリーズやクラッシュの解消
Rspackの実験的サポート
96%のテストが通るWebpack互換バンドラーnext-rspackのコミュニティサポート
🔧 Next.js 15.4
主要な変更点
Turbopack builds の統合テスト100%達成
next build --turbopack が8298の統合テスト全てをパス、vercel.comで実戦投入
Next.js 16のプレビュー機能
Node.js Middleware(安定版)、Deployment Adapters(アルファ版)の準備
キャッシュコンポーネント(ベータ版)
Dynamic IO、use cache、Partial Prerenderingを統合した cacheComponents フラグ
非推奨化
Node.js 18サポート、AMPサポート、一部のnext/image APIが非推奨化
🔧 Next.js 15.5
主要な変更点
Turbopack builds(ベータ版)
本番ビルドでのTurbopackがベータ版に昇格、vercel.com、v0.app、nextjs.orgで実戦投入
パフォーマンス結果 顧客サイト: 4コアマシンで2倍、14コアマシンで2.2倍高速化
Node.js Middleware(安定版)
15.2で実験的だったNode.jsランタイムサポートが安定版に
export const config = {
  runtime: 'nodejs', // Now stable!
}
TypeScriptの大幅改善
型付きルート(安定版)
TurbopackでのフルType Safetyとコンパイル時のリンクチェック
const nextConfig = {
  typedRoutes: true, // Now stable!
}
Route Props Helpers
PageProps、LayoutProps、RouteContextの自動生成
// Before: Manual typing
interface Props {
  params: Promise<{ slug: string }>
  children: React.ReactNode
}

// After: Automatic typing
export default function Layout(props: LayoutProps<'/dashboard'>) {
  return <div>{props.children}</div>
}
next typegen コマンド
next dev/build なしでの型生成が可能
next typegen && tsc --noEmit
next lint の非推奨化
Next.js 16でnext lintが削除、ESLintやBiomeへの移行推奨
# Migration codemod
npx @next/codemod@latest next-lint-to-eslint-cli .
Next.js 16向け非推奨警告
legacyBehavior、AMP、next/image設定の非推奨警告追加
🚨 破壊的変更の詳細
1. 非同期Request API
すべての request-specific API が非同期化されました:
// Next.js 14
export async function generateMetadata({ params }) {
  const slug = params.slug // 同期
  return { title: slug }
}

// Next.js 15
export async function generateMetadata({ params }) {
  const slug = (await params).slug // 非同期
  return { title: slug }
}
2. キャッシュング変更
デフォルトでキャッシュされなくなった項目:
fetch()リクエスト- GET Route Handlers
- Client Router Cache
オプトインでキャッシュする方法:
// fetch with cache
fetch('/api/data', { cache: 'force-cache' })

// Route Handler with cache
export const dynamic = 'force-static'

// Client cache with staleTimes
const nextConfig = {
  experimental: {
    staleTimes: {
      dynamic: 30,
      static: 180,
    },
  },
}
3. 削除されたAPI
NextRequest.geoNextRequest.ip@next/fontパッケージ- Speed Insights自動計測
🛠️ 移行ガイド
1. 自動移行ツール
npx @next/codemod@canary upgrade latest
2. 手動移行手順
依存関係の更新
npm install next@latest react@latest react-dom@latest
npm install @types/react@latest @types/react-dom@latest
非同期APIの対応
// Use the provided codemod or update manually
import { cookies } from 'next/headers'

export async function MyComponent() {
  const cookieStore = await cookies()
  const token = cookieStore.get('token')
  return <div>{token}</div>
}
キャッシュの明示的設定
// Force caching where needed
const nextConfig = {
  experimental: {
    staleTimes: {
      dynamic: 30,
      static: 180,
    },
  },
}
3. 段階的移行戦略
- Phase 1: Next.js 15.x + React 18(Pages Router)
- Phase 2: React 19への移行
- Phase 3: App Routerの本格採用
- Phase 4: Turbopackの導入検討
🎯 推奨アップグレード戦略
小規模プロジェクト
- 自動移行ツール実行
- テスト実行
- 本番デプロイ
大規模プロジェクト
- 開発環境での検証
- 非同期API対応の段階的実装
- キャッシュ戦略の見直し
- パフォーマンステスト
- 段階的本番ロールアウト
注意点
- React 19はまだ新しいため、エコシステムの対応状況を確認
- Turbopackは15.5でベータ版、本番利用は慎重に検討
- 大幅なキャッシュ変更により、パフォーマンス特性が変わる可能性
📊 パフォーマンス改善
Turbopack
- 開発時間: 最大57.6%短縮
- メモリ使用量: 30%削減
- ビルド時間: CPUコア数に応じて28-83%高速化
その他の改善
- TypeScript LSPの60%高速化
- 静的生成の高速化
- ソースマップの精度向上
🔮 今後の展望(Next.js 16)
予定されている主要変更:
- Node.js Middleware がデフォルト
- AMP サポート完全削除
- next lint 削除
- Turbopack 本番ビルド安定化
- より強化されたキャッシングシステム
この資料を参考に、プロジェクトの要件に応じてNext.js 15への移行計画を立てることをお勧めします。特に非同期APIとキャッシュの変更は影響が大きいため、十分なテストを行ってください。
3000番ポートを開放する
● 3000番ポートを開放する
lsof -i :3000
結果例
COMMAND   PID USER   FD   TYPE             DEVICE SIZE/OFF NODE NAME
node    23409 hogehoge   13u  IPv6 0xd079e406c320d408      0t0  TCP *:hbci (LISTEN)
node    23409 hogehoge   25u  IPv6 0x4d1ed927682eeb8f      0t0  TCP localhost:hbci->localhost:64032 (CLOSED)
node    23409 hogehoge   29u  IPv6  0x5df33dc0b699ffd      0t0  TCP localhost:hbci->localhost:64034 (CLOSED)
node    23409 hogehoge   30u  IPv6 0x640ef1c3b60ca6e7      0t0  TCP localhost:hbci->localhost:64033 (CLOSED)
node    23409 hogehoge   35u  IPv6 0x4f68dc69324ab8bd      0t0  TCP localhost:hbci->localhost:64035 (CLOSED)
node    23409 hogehoge   36u  IPv6 0x41ce43e3d3e75aae      0t0  TCP localhost:hbci->localhost:64036 (CLOSED)
node    23409 hogehoge   37u  IPv6 0xa9345b30cf6b9958      0t0  TCP localhost:hbci->localhost:64042 (CLOSED)
node    23409 hogehoge   38u  IPv6 0xc5d892a9aadbc810      0t0  TCP localhost:hbci->localhost:64037 (CLOSED)
● プロセスを kill する
kill 23409
それでも残っている場合は
● プロセスを強制的に kill する
kill 23409
Next.js に HeroUI ( + tailwindcss@4 ) を設定する。
新しいバージョンの HeroUI ( + tailwindcss@4 )をノリで適当にインストールすると、cssがきなかい。ということが起きるのでしっかりと設定方法を確認しましょう。
● heroui のインストール
npm install @heroui/react framer-motion
● hero.ts の作成 と 読み込み
hero.tsが必要になります。hero.ts - HeroUIプラグインの定義です。
重要なのは:
- hero.ts - HeroUIプラグインの定義
- @plugin "./hero.ts" - プラグインの読み込み
- @source - HeroUIテーマファイルの読み込み を行うということです。
hero.ts
import { heroui } from "@heroui/react";
export default heroui();
globals.css
@import "tailwindcss";
@plugin "./hero.ts";

/* このファイルからの相対パス */
@source "../../node_modules/@heroui/theme/dist/**/*.{js,ts,jsx,tsx}";

@custom-variant dark (&:is(.dark *));
postcss.config.mjs
const config = {
    plugins: {
        "@tailwindcss/postcss": {
            content: [
                // ● 実は以下の行は不要です。削除してしまってもok
                // "./src/**/*.{js,ts,jsx,tsx}",
                // "./node_modules/@heroui/**/*.{js,ts,jsx,tsx}"
            ]
        }
    }
};

export default config;
tailwind.config.ts → 不要です。
以上です。簡単ですね。
● 確認方法
1 . src/app/providers.tsx
'use client'

import { FC, ReactNode } from "react"
import {HeroUIProvider} from "@heroui/react";

type Props = {
  children: ReactNode;
}

export const Providers: FC<Props> = ({children}) => {
  return (
    <HeroUIProvider>
      {children}
    </HeroUIProvider>
  );
};
2 . src/app/layout.tsx
+      <Providers>
        {children}
+      </Providers>
3 . src/app/page.tsx
'use client'

import {Button} from "@heroui/react";

export default function Home() {
  return (
    <Button color="secondary">Button</Button>
);
}
黄金比でレイアウトされるLiftkitコンポーネント
Liftkitのインストール
npm install @chainlift/liftkit --save-dev
npx liftkit init
ボタンコンポーネントをインストールする
npm run add button
import Button from "@/components/button";
<Button
  color={'secondary'}
  label={'ボタンのラベル'}
  size="sm"
  variant={'text'}
  startIcon={'trash-2'}
  opticIconShift={false}
  onClick={clearAll}
/>
Next.js に biome をインストールする
● biome のインストール
npm install --save-dev --save-exact @biomejs/biome
● biome.json の自動生成
npx @biomejs/biome init
package.json に追加する
"lint:biome": "biome lint -- apply ./src",
"format": "biome format ./src --write",
"check": "biome check --apply ./src"
● biomeの設定
デフォルトから設定を追加した方がいいところを記述していきます。
・定義されていない変数を使っているときにエラーを出す
"rules": {
  "recommended": true,
  "correctness": {
    "noUndeclaredVariables": "error"
  }
}
・シングルクォーテーションを使う
{
  "javascript": {
    "formatter": {
      "quoteStyle": "single",
      "jsxQuoteStyle": "single"
    }
  }
}
ビルド時に tsc の方チェックを省略するとどれくらいビルドが早くなるのか?
ビルド時に tsc の方チェックを省略するとどれくらいビルドが早くなるのか? 適当なアプリでビルドしてみた。
1 . 通常のビルド
1回目
real 1m38.104s
2回目
real 1m37.173s
3回目
real 1m32.396s
next.config.js から tsc の 型エラーチェックを外す
  typescript: {
    ignoreBuildErrors: true,
  },
2 . 型チェックを省略したビルド
1回目
real 1m46.637s
2回目
real 1m29.692s
3回目
real 1m28.359s
4 〜 10秒程度短縮できます。
next.js のビルドサイズを解析する
https://nextjs.org/docs/app/guides/package-bundling
インストール
npm i @next/bundle-analyzer
next.config.js
const withBundleAnalyzer = require('@next/bundle-analyzer')({
  enabled: process.env.ANALYZE === 'true',
})

module.exports = withBundleAnalyzer(nextConfig)
機動
ANALYZE=true npm run build
next.js instrumentation.ts
next.config.js にて instrumentationHook を有効にする
module.exports = {
  experimental: {
    instrumentationHook: true,
  },
}
export async function register() {
  if (process.env.NEXT_RUNTIME === "nodejs") {
    await import("./instrumentation.node.ts");
  }
}
https://nextjs.org/docs/app/guides/open-telemetry
next.js 本番環境でデバッグする
next.config.js
const nextConfig = {
  .........

  // 追加
  productionBrowserSourceMaps: true,
}
これで .ts ファイルが見えるようになります。あとは command + shift + P からブレイクポイント追加してデバッグします。
Next.js production mode でログを取得したい
現時点でまだオプションとしては存在しておらず、以下のような方法をよく見かけます
● middlewareで行う方法
https://codeparrot.ai/blogs/nextjs-middleware-simple-guide-to-control-requests
● パッチを当てる方法
https://www.tomups.com/posts/log-nextjs-request-response-as-json/
Next.js app router の SSR の Data cache Revalidation について
● Next.js app router の SSR の Data cache Revalidation について
https://nextjs.org/docs/app/building-your-application/caching#revalidating-1
1. Time-based Revalidation
一定時間が経過し、新しいリクエストが行われた後にデータを再検証する。 これは、変更頻度が低く、鮮度がそれほど重要でないデータに有効である。
時間間隔でデータを再検証するには、fetchのnext.revalidateオプションを使用して、リソースのキャッシュ寿命(秒)を設定します。
2. On-demand Revalidation
イベント(フォーム送信など)に基づいてデータを再検証します。 オンデマンド再検証では、タグベースまたはパスベースのアプローチを使用して、データのグループを一度に再検証できます。 これは、最新のデータをできるだけ早く表示したい場合に便利です(ヘッドレスCMSのコンテンツが更新された場合など)。
// 時間ベースの再検証 ( Time-based )
fetch(url, { next: { revalidate: 3600 } }) // 1時間

// CMS更新時 ( On-demand )
async function handleCMSWebhook() {
 await fetch('/api/revalidate?tag=article')
}
Next.js Version 15 でのキャッシュ挙動のまとめ
● Next.js AppRouter には 4種類のキャッシュがある
https://nextjs.org/docs/app/building-your-application/caching
| 種類 | デフォルト on / off |
|---|---|
| 1 . Request Memoization | on |
| 2 . Data Cache | off |
| 3 . Full Route Cache | on |
| 4 . Client-side Router Cache | off |
● キャッシュを無効(opting out) 有効(opting in)にする
・1 . Request Memoization - opting out
https://nextjs.org/docs/app/building-your-application/caching#opting-out
signalを使って opting out します
const { signal } = new AbortController()
fetch(url, { signal })
・2 . Data Cache
https://nextjs.org/docs/app/building-your-application/caching#opting-out-1
デフォルトで opting out されています
明示的に opting out するには { cache: 'no-store' } を使って opting out します
let data = await fetch('https://api.vercel.app/blog', { cache: 'no-store' })
Data Cacheをopting in するには
// v14以前同様、無期限キャッシュをopt-in
fetch(`https://...`, { cache: 'force-store' })

// fetch時に`next: { revalidate: 3600 }`を指定して有効期限を設定
fetch('https://...', { next: { revalidate: 3600 } })
cache と next: { revalidate: xxxx } は同時に指定できません。(同時指定した場合 revalidate が優先されます)
(ただし cache: 'no-store' を指定した場合はこちらが優先されます)
引用: https://zenn.dev/akfm/articles/nextjs-cache-default-update#data-cacheの無効化
・3 . Full Route Cache - opting out
https://nextjs.org/docs/app/building-your-application/caching#opting-out-2
3つの方法があります
・Dynamic API (cookieをset)を使用するルートでは opting out される
・export const dynamic = 'force-dynamic'; を記述している場合 opting out される
・キャッシュを持たない fetch 関数が使用されている場合 を記述している場合 opting out される
・4 . Client-side Router Cache - opting out
https://nextjs.org/docs/app/building-your-application/caching#opting-out-3
デフォルトで opting out されています
next.js の /api/ エンドポイントを /apinext/ に変えたい
● next.js の /api/ エンドポイントを /apinext/ に変えたい
Next.jsのAPIルートのパスを変更するには、next.config.jsでリライトルールを設定します。
// next.config.js
/** @type {import('next').NextConfig} */
const nextConfig = {
  async rewrites() {
    return [
      {
        source: '/apinext/:path*',
        destination: '/api/:path*',
      },
    ];
  },
}

module.exports = nextConfig
Next.js で 警告「Skipping auto-scroll behavior due to `position: sticky` or `position: fixed` on element」
● Next.js で 警告「Skipping auto-scroll behavior due to position: sticky or position: fixed on element」が出る場合の対応
router.push(`/mypage`);
↓
router.push(`/mypage`, { scroll: false });
Next.js で Next UI
npm i @nextui-org/react framer-motion
tailwind.config.ts
// tailwind.config.js
const {nextui} = require("@nextui-org/react");

/** @type {import('tailwindcss').Config} */
module.exports = {
  content: [
    ......
    // ● NextUI この行を追加
    "./node_modules/@nextui-org/theme/dist/**/*.{js,ts,jsx,tsx}",
  ],
  theme: {
    extend: {},
  },
  darkMode: "class",
  plugins: [nextui()],
};
Next.js AppRoute で Firesotreチャットアプリサンプル
● Firebase での設定
・Firebase Console から プロジェクトを作成
・Firestore Database → データベースを作成
・プロジェクトの設定 → ウェブアプリに Firebase を追加 → configを保存。
● Cloud Firestore のルールを変更する
service cloud.firestore {
  match /databases/{database}/documents {
    match /{document=**} {
      allow read, write: if true;
    }
  }
}
● Next.jsアプリを初期化
npx create-next-app@latest
● npm インストール
npm install firebase
● ファイルを設置
1. src/app/chat/[roomId]/page.tsx
import { ChatRoom } from "@/features/ChatRoom";

type PageProps = {
  params: {
    roomId: string;
  };
};
export default function ChatRoomPage({ params }: PageProps) {
  const roomId = params.roomId;

  if (!roomId) return <div>error</div>;

  return <ChatRoom roomId={roomId} />;
}
2. src/common/firebase/firebaseConfig.ts
import { initializeApp } from "firebase/app";
import { getFirestore } from "firebase/firestore";

const firebaseConfig = {
  apiKey: process.env.NEXT_PUBLIC_FIREBASE_API_KEY,
  authDomain: process.env.NEXT_PUBLIC_FIREBASE_AUTH_DOMAIN,
  projectId: process.env.NEXT_PUBLIC_FIREBASE_PROJECT_ID,
  storageBucket: process.env.NEXT_PUBLIC_FIREBASE_STORAGE_BUCKET,
  messagingSenderId: process.env.NEXT_PUBLIC_FIREBASE_MESSAGING_SENDER_ID,
  appId: process.env.NEXT_PUBLIC_FIREBASE_APP_ID,
  measurementId: process.env.NEXT_PUBLIC_FIREBASE_MEASUREMENT_ID,
};

const app = initializeApp(firebaseConfig);

export const firestoreDb = getFirestore(app);
3. src/features/ChatRoom.tsx
"use client";

import { firestoreDb } from "@/common/firebase/firebaseConfig";
import {
  addDoc,
  collection,
  onSnapshot,
  query,
  Timestamp,
} from "firebase/firestore";
import { useRouter } from "next/navigation";
import { FC, useEffect, useState } from "react";

type Message = {
  id: string;
  text: string;
  createdAt: Timestamp;
  senderId: string;
  username: string;
};

interface ChatRoomProps {
  roomId: string;
}

export const ChatRoom: FC<ChatRoomProps> = ({ roomId }) => {
  const router = useRouter();
  const [messages, setMessages] = useState<Message[]>([]);
  const [newMessage, setNewMessage] = useState("");
  const [username, setUsername] = useState<string>("");
  const [currentUser, setCurrentUser] = useState<string | null>(null);

  useEffect(() => {
    if (!roomId) return;

    const q = query(collection(firestoreDb, `chatRooms/${roomId}/messages`));
    const unsubscribe = onSnapshot(q, (querySnapshot) => {
      const msgs: Message[] = [];
      querySnapshot.forEach((doc) => {
        const data = doc.data();
        msgs.push({
          id: doc.id,
          text: data.text,
          createdAt: data.createdAt,
          senderId: data.senderId,
          username: data.username,
        });
      });
      setMessages(msgs);
    });

    return () => unsubscribe();
  }, [roomId]);

  const handleSetUsername = () => {
    if (username.trim()) {
      setCurrentUser(username);
    }
  };

  const sendMessage = async () => {
    if (!newMessage.trim() || !currentUser) return;

    await addDoc(collection(firestoreDb, `chatRooms/${roomId}/messages`), {
      text: newMessage,
      createdAt: Timestamp.fromDate(new Date()),
      senderId: "user123", // 実際のユーザーIDに置き換え
      username: currentUser,
    });
    setNewMessage("");
  };

  return (
    <div>
      {!currentUser ? (
        <div>
          <h2>Set your username</h2>
          <input
            type="text"
            value={username}
            onChange={(e) => setUsername(e.target.value)}
          />
          <button onClick={handleSetUsername}>Set Username</button>
        </div>
      ) : (
        <div>
          <h1>Chat Room: {roomId}</h1>
          <div>
            {messages.map((msg) => (
              <div key={msg.id}>
                <p>
                  <strong>{msg.username}:</strong> {msg.text}
                </p>
                <span>{msg.createdAt.toDate().toString()}</span>
              </div>
            ))}
          </div>
          <input
            type="text"
            value={newMessage}
            onChange={(e) => setNewMessage(e.target.value)}
          />
          <button onClick={sendMessage}>Send</button>
        </div>
      )}
    </div>
  );
};
4. src/common/types/env.d.ts
declare namespace NodeJS {
  interface ProcessEnv {
    readonly NEXT_PUBLIC_FIREBASE_API_KEY: string;
    readonly NEXT_PUBLIC_FIREBASE_AUTH_DOMAIN: string;
    readonly NEXT_PUBLIC_FIREBASE_PROJECT_ID: string;
    readonly NEXT_PUBLIC_FIREBASE_STORAGE_BUCKET: string;
    readonly NEXT_PUBLIC_FIREBASE_MESSAGING_SENDER_ID: string;
    readonly NEXT_PUBLIC_FIREBASE_APP_ID: string;
    readonly NEXT_PUBLIC_FIREBASE_MEASUREMENT_ID: string;
  }
}
5. .env.development
firebase設定を記述します
Next.js AppRouter のおすすめeslint 設定
● typescript-eslint の追加
npm i -D @typescript-eslint/eslint-plugin
.eslintrc.json
{
  "extends": [
    "prettier",
    "next/core-web-vitals",
    "plugin:@typescript-eslint/recommended"
  ],
  "rules": {
    // img を許可
    "@next/next/no-img-element": "off",
    "@typescript-eslint/no-explicit-any": "error",
    "@typescript-eslint/no-unused-vars": [
      "error",
      {
        "argsIgnorePattern": "^_"
      }
    ],
    // 型の場合 import type に修正してくれる
    "@typescript-eslint/consistent-type-imports": "error",
    // displayName を省略
    "react/display-name": "off"
  }
}
next.js で Google Analytics
● react-ga4 を使用する場合
npm i react-ga4
src/googleAnalytics/GoogleAnalytics.tsx
'use client';

import ReactGA from 'react-ga4';
import { usePathname, useSearchParams } from 'next/navigation';
import { useEffect } from 'react';

export const GOOGLE_ANALYTICS_ID =
  process.env.NEXT_PUBLIC_GOOGLE_ANALYTICS_ID ?? '';

ReactGA.initialize(GOOGLE_ANALYTICS_ID, {
  // testMode: true,
});

export const GoogleAnalytics = () => {
  const pathname = usePathname();
  const searchParams = useSearchParams();

  useEffect(() => {
    if (!GOOGLE_ANALYTICS_ID) return;

    const url = pathname + searchParams.toString();
    // react-ga4:pageview
    ReactGA.send({ hitType: 'pageview', page: url });

    // react-ga4 : set
    // ReactGA.set({ UserID: 123456798 });

  }, [pathname, searchParams]);

  return null;
};
src/app/layout.tsx
import { GoogleAnalytics } from '@/googleAnalytics/GoogleAnalytics';

export default function RootLayout({
  children,
}: Readonly<{
  children: React.ReactNode;
}>) {
  return (
    <html lang="en">
      <GoogleAnalytics />
      <body className={inter.className}>{children}</body>
    </html>
  );
}
dynamic assetPrefix
引用 : https://github.com/vercel/next.js/discussions/18301
if you use a custom server, after calling next(), you can reset the asset path at any time
  if (assetPrefix) {
    nextApp.setAssetPrefix(assetPrefix);
  }
lint-staged と husky を設定する
● lint-staged と husky のインストール
npm i -D husky lint-staged
● husky の初期化(v9)
npx husky init
● husky の初期化(v8)
npx husky install
● huskyのpre-commit の追加
.husky/ディレクトリ内の pre-commit に作成する
echo "npx lint-staged" > .husky/pre-commit
● husky の設定ファイルの作成
huskyの設定を書ける箇所
1. package.json
2. .huskyrc
3. husky.config.js
4. .husky/ディレクトリ
● lint-staged の設定ファイルの作成
lint-stagedの設定を書ける箇所
1. package.json
2. .lintstagedrc
package.json
{
  "lint-staged": {
    "*": "your-cmd"
  }
}
.lintstagedrc
{
  "*": "your-cmd"
}
● lint-stagedのオプション
concurrent: デフォルトはtrueです。リンターコマンドを並列で実行するかどうかを制御します。falseに設定すると、リンターコマンドは逐次的に実行されます。chunkSize: 並列処理のチャンクサイズを設定します。デフォルトはmaxCpuCount - 1です。小さな値に設定すると、より多くのプロセスが作成されますが、OOMのリスクが高くなります。globOptions: グロブパターンのオプションを指定します。たとえば{ dot: true }とすると、ドットファイルも対象に含まれます。ignore: 無視するパターンを指定します。配列で複数指定できます。linters: リンターの実行順序を制御します。デフォルトではリンターは並列実行されますが、このオプションで順序付けることができます。matching: ファイルのマッチングパターンを制御します。デフォルトは["**/*"]です。relative: ワーキングディレクトリを基準にするか、プロジェクトルートを基準にするかを指定します。デフォルトはtrueです。shell: コマンドを実行するシェルを指定します。デフォルトは/bin/shです。verbose: 詳細なログを出力するかどうかを指定します。デフォルトはfalseです。subTaskConcurrency: タスクの並列実行数を指定します。デフォルトは1です。
● lint-staged のテスト
1. エラーがあるコンポーネントを作成する
src/components/Hello.tsx
const Home = () => {
  let unused = 'hello';

  return (
    <div>
      <h1>Hello World</h1>
    </div>
  );
};
2. npm run lint でエラーが出ることを確認する
npm run lint
3. git commit でエラーが出ることを確認する
git add -A
git commit
 git commit
✖ No valid configuration found.
husky - pre-commit script failed (code 1)
● eslint の 設定したタスク(コマンド)return code を確認する
lint-staged は設定したタスク(コマンド)の終了コードが 0 以外の場合、gitコミットをキャンセルする。という手法で動いています。
そこで実行したいタスクの終了コードがエラー時に 0以外を返すかどうかは調べておきましょう。
npx eslint --fix src/MyComponent.tsx; echo "ESLint exit code: $?"
eslint で typescript エラーを吐かせる
● eslint で typescript エラーを吐かせる(eslintプラグインを使う方法)
npm i -D @typescript-eslint/eslint-plugin
.eslintrc.json に 吐かせたいルールを追記することで、typescriptエラーも表示させることができます。
{
  "extends": [
    "plugin:@typescript-eslint/recommended",
    "next/core-web-vitals"
  ],
  "rules": {
    "@typescript-eslint/no-unused-vars": "warn",
    "@typescript-eslint/no-explicit-any": "warn"
  }
}
● lint-staged で typescript エラーを吐かせる(tscを使う方法)
  "lint-staged": {
    "./**/*.{js,jsx,ts,tsx}": [
      "tsc --pretty --noEmit"
    ],
  },
● typescript のエラーとなるコードの例
// 1. 型の不一致
const numberVar: number = "this is not a number";

// 2. 未定義の変数の使用
console.log(undeclaredVariable); // 未定義の変数


// 3. 関数のパラメータの型ミスマッチ
function addNumbers(a: number, b: number) {
    return a + b;
}
addNumbers(1, "2"); // 第二引数が不正な型

// 4. プロパティが存在しない
const obj = { name: "Alice", age: 30 };
console.log(obj.salary);

// 5. 関数の必須引数の欠如
function greet(name: string) {
    return `Hello, ${name}!`;
}
greet();


// 6. インターフェースの実装エラー
interface Person {
    name: string;
    age: number;
}
const alice: Person = { name: "Alice" };

// 7. ユニオン型の誤用
type StringOrNumber = string | number;
const value: StringOrNumber = true;
next.js の 多言語ブログで ビルド時に静的にルートを生成して高速化する
● npm run build の結果が Dynamic の時は、静的にルート生成できるかどうかを検討すると良いです。
┌ ○ /                                    141 B          84.6 kB
├ λ /[Code]/about                  2.16 kB         276 kB
λ (Dynamic) server-rendered on demand using Node.js
↑ この記号が出ているということはダイナミックルートになっています。
こちらを静的ルートに変更してみましょう。
layout.tsx または page.tsx に以下を追加します。
import {locales} from "@/i18n";

/**
 * 多言語をSSGする
 */
export function generateStaticParams() {
  return locales.map((locale) => ({locale}));
}
これで再度ビルドして静的にルートを生成されていることを確認します
Next.js の App Router ざっくりまとめ
● Next.jsの App Router , Pages Router で登場する名称
| ---- | App Router | Pages Router |
|---|---|---|
| APIルートの名前 | Route Handlers | API Routes |
| useRouterの場所 | import {useRouter} from "next/navigation" | import { useRouter } from "next/router" |
● app router の特別な命名
/app/ ディレクトリ以下では次の命名は特別な意味を持ちます。
layout.tsx |
レイアウト(再レンダリングされない) |
template.tsx |
レイアウト(再レンダリングされるので意図的に際レンダリングしたい場合はこっちを使う) |
page.tsx |
ルーティングファイル(一時的にルートをオフにする場合は ___page.tsx にリネームするなどします) |
loading.tsx |
ローディング コンポーネント |
not-found.tsx |
NotFound コンポーネント |
error.tsx |
React Error Boundary を利用したエラー コンポーネント。 next.js ではデフォルトで以下のようにErrorBoundaryが設定されているので 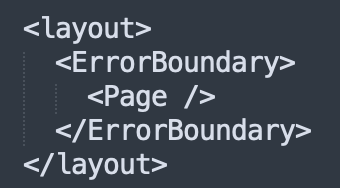 error.tsx を記述するだけでpage.tsxのエラー補足をすることができます。
なので、layout.tsx や template.tsx で発生したエラーの捕捉は error.tsx ではできません
error.tsx を記述するだけでpage.tsxのエラー補足をすることができます。
なので、layout.tsx や template.tsx で発生したエラーの捕捉は error.tsx ではできません |
global-error.tsx |
アプリ全体のエラーを捕捉する。page.tsxと同階層に error.tsx が存在しない場合は global-error.tsx が表示されます Handling Errors in Root Layouts layout.tsx や template.tsx で発生したエラーの捕捉は global-error.tsx でしかできないようです。 global-error.tsx ではコンテキストが受け取れないので注意(error.tsxでやりましょう。) |
route.tsx |
サーバー側 API エンドポイント |
default.tsx |
並列ルートのフォールバック コンポーネント |
src/app/api/hello/route.ts
import { NextResponse, NextRequest } from 'next/server';

export const GET = async () => {
  return NextResponse.json(
    { message: 'Hello, Next.js route.ts!' },
    { status: 200 }
  );
};

export const POST = async (request: NextRequest) => {
  const body = await request.json();
  console.log({ body });

  // Do something

  return NextResponse.json(
    { message: 'Operation successful' },
    { status: 200 }
  );
};
● next.js app router でリダイレクトする
1. サーバーサイドの場合 ( redirect )
・ /mypage へリダイレクトする
import { redirect } from "next/navigation"

redirect("/mypage")
・ 404画面へリダイレクトする
import { notFound } from "next/navigation"

return notFound()
または src/middleware.ts でリダイレクトすることができます。
2. クライアントサイドの場合 ( useRouter )
・ /mypage へリダイレクトする
import { useRouter } from 'next/navigation'

const router = useRouter()
router.push("/mypage")
・ 404画面へリダイレクトする
import { notFound } from "next/navigation"

return notFound()
● 独自の404Not Foundページを作成する
app/not-found.tsx
import Link from 'next/link'

export default function NotFound() {
  return (
    <div>
      <h2>Not Found</h2>
      <p>Could not find requested resource</p>
      <Link href="/">Return Home</Link>
    </div>
  )
}
File Conventions: not-found.js | Next.js
● app router の Middleware
画面遷移時に各ページ実行前に middleware で処理を挟み込めます。
(例1: /dashboard へのアクセスを /dashboard-new へリダイレクトさせる)
src/middleware.ts (注意: src/app/middleware.ts ではありません)
import { NextResponse } from "next/server"
import type { NextRequest } from "next/server"

export function middleware(request: NextRequest) {
  return NextResponse.redirect(new URL("/dashboard-new", request.url))
}

export const config = {
  matcher: "/dashboard",
}
matcher: middlewareが動作する対象のパス
(例2: /dashboard へアクセスしたとき、ログイン前の場合は /login へリダイレクトさせる)
src/middleware.ts (注意: src/app/middleware.ts ではありません)
import { NextResponse } from "next/server"
import type { NextRequest } from "next/server"
import { currentUser } from "@/firebase/firebaseAuth"

export async function middleware(request: NextRequest) {
  return (await isAuthenticated())
    ? NextResponse.next()
    : NextResponse.redirect(new URL("/login", request.url))
}

export const config = {
  matcher: "/dashboard",
}

async function isAuthenticated(): Promise<boolean> {
  // サーバーサイドでユーザー認証を確認するロジック
}
middlewareはサーバーサイドなので、例えば firebaseのようにユーザーの取得がクライアントサイドの場合は ここに記述せずにクライアント側で記述するか、サーバーでも認証状態を持つ必要があります。
ローカライゼーション
https://zenn.dev/cybozu_frontend/articles/nextjs-i18n-app-router
● ルーティング ( 動的ルーティング )
app/blog/[slug]/page.tsx
この時 /blog/hoge/?page=2 にアクセスした時 hoge や pageを取得したい時は以下のように取得します。
type PageProps = {
  params: {
    slug: string
  }
  searchParams: { [key: string]: string | string[] | undefined }
}

export default function Page({
    params ,
    searchParams,
}: PageProps) {
  return <div>My Post: {params.slug}</div>
}
取得した値は以下のようになります。
params = { slug: 'acme' }
searchParams ={ page: '2' }
● app router の layout.tsxでサイト全体のフォントを設定する
src/app/layout.tsx
const notoSansJp = Noto_Sans_JP({
  weight: ["500"],
  subsets: ["latin"],
  variable: "--font-noto-sans-jp",
})
body タグに フォントを設定します。
  return (
    <html lang="en">
      <body className={notoSansJp.className}>{children}</body>
    </html>
  )
または フォント名の変数を使えるようにします。
<html lang="ja" className={`${notoSansJP.variable}`}>
● app routerでページごとのHTMLタイトルなどヘッダの設定方法
https://nextjs.org/docs/app/building-your-application/optimizing/metadata
1. layout.tsx または page.tsx に静的に設定する
import type { Metadata } from 'next'

export const metadata: Metadata = {
  title: '...',
  description: '...',
}

export default function Page() {}
2. page.tsx にページ毎に動的に設定する
app/posts/[id]/page.tsx
export async function generateMetadata({
  params,
}: PageProps): Promise<Metadata> {
  return {
    title: `投稿データ{params.id}`,
  }
}
3. page.tsx にページ毎に検索エンジン(Google)のインデックスを設定する
app/posts/[id]/page.tsx
// 検索エンジンにインデックスさせない設定
export const metadata: Metadata = {
  robots: {
    index: false,
    follow: false,
    // no-cache
    nocache: true,
  },
}
● page.tsx で httpヘッダ , cookie , クエリパラメーターを取得する
httpヘッダ , cookie 取得
import { cookies, headers } from 'next/headers';

  // cookie
  const cookieStore = cookies();
  console.log('● cookieStore');
  console.log(cookieStore);

  // headers
  const httpHeaders = headers();
  console.log('● httpHeaders');
  console.log(httpHeaders);
クエリパラメーター 取得
import MyServerComponent from "./MyServerComponent";

type PostsPageSearchParams = {
  page?: string;
  sort_by?: string;
  sort_order?: "asc" | "desc";
};
type Props = {
  params: {};
  searchParams: PostsPageSearchParams;
};

export default function Page(props: Props) {
  const searchParams = props.searchParams;
  console.log(searchParams.pages); // ❌ Error: Property 'pages' does not exist on type 'PostSearchParams'. Did you mean 'page'?
  return <MyServerComponent searchParams={searchParams}></MyServerComponent>;
}
● 画像
こちらがよくまとまっています。
https://dev.classmethod.jp/articles/next-js-image-component/
● css ( グローバルcss )
( グローバルcss 1. ) cssを以下のファイルに保存する
(タグのcssを設定する場合はグローバルcssに設定しないとエラーとなります。)
app/globals.css (ファイル名は任意。デフォルトでは globals.css)
body {
  padding: 60px;
}
( グローバルcss 2. ) レイアウトコンポーネントから参照する
app/layout.tsx(ファイル名は任意。デフォルトでは layout.tsx)
import './global.css'
● css ( cssモジュール )
( cssモジュール 1. ) cssを以下のファイルに保存する
app/hello/page.module.css (ファイル名は任意)
.page_container {
    display: grid;
    gap: 10px;
}
( cssモジュール 2. ) コンポーネントから参照する
app/hello/page.tsx(ファイル名は任意)
import css from "./layout.module.css";
jsx の classNameに指定します
<div className={css.page_container}>
   hoge
</div>
注意点 ケバブケース ( kebab-case ) は使用できません。
キャメルケースを使用しましょう。注意点 タグ名は直接使用できません
  /* こちらは反映されません */
  .page-container div {
    background-color: red;
  }
● App routerのRoute Groups
https://blog.furu07yu.com/entry/using-route-groups-for-layouts-in-nextjs-13
● Next.js App router で Tanstack Queryを使用する
src/app/providers.tsx
import React, { ReactNode, useState } from "react"
import { QueryClient, QueryClientProvider } from "@tanstack/react-query"

type ProvidersProps = {
  children: ReactNode
}

const Providers: React.FC<ProvidersProps> = ({ children }) => {
  const [queryClient] = useState(() => new QueryClient())

  return (
    <QueryClientProvider client={queryClient}>{children}</QueryClientProvider>
  )
}

export default Providers
src/app/layout.tsx
// app/layout.jsx
import Providers from './providers'

export default function RootLayout({ children }) {
  return (
    <html lang="en">
      <head />
      <body>
        <Providers>{children}</Providers>
      </body>
    </html>
  )
}
● サーバーサイドでのエラー補足
https://x.com/azu_re/status/1760494278965629256?s=20
● 開発モードで fetch のログを表示する
https://nextjs.org/docs/app/api-reference/next-config-js/logging
next.config.js
module.exports = {
  logging: {
    fetches: {
      fullUrl: true,
    },
  },
}
参考 : https://speakerdeck.com/mugi_uno/next-dot-js-app-router-deno-mpa-hurontoendoshua-xin
● ビルド時にサーバーサイドfetchが自動で実行される(Next.js の fetchCacheオプション)
・ビルド時に fetch が実行される例
// cacheオプション指定なし
const data = await fetch(url);
// 'no-cache'を指定してもビルド時のfetchは実行されます
const data = await fetch(url, { cache: 'no-cache' });
・ビルド時に fetch が実行さない例
const data = await fetch(url, { cache: 'no-store' });
または page.tsx や layout.tsx の先頭に
export const dynamic = 'force-dynamic';
と記述すると、ダイナミックページであることが強制されるのでビルド時のfetchも走りません。
こちらもビルド時のfetchは走りません。
page.tsx
export const dynamic = 'force-dynamic';

const FooPage = async () => {
  // 'force-cache' となっているが、ビルド時のfetchは走らない
  const data = await fetch(url, { cache: 'force-cache' });
  .....
● jestを設定する
https://nextjs.org/docs/app/building-your-application/testing/jest
import type { Config } from 'jest'
import nextJest from 'next/jest.js'

const createJestConfig = nextJest({
  // Provide the path to your Next.js app to load next.config.js and .env files in your test environment
  dir: './',
})

// Add any custom config to be passed to Jest
const config: Config = {
  coverageProvider: 'v8',
  testEnvironment: 'jsdom',
  // Add more setup options before each test is run
  // setupFilesAfterEnv: ['<rootDir>/jest.setup.ts'],
}

// createJestConfig is exported this way to ensure that next/jest can load the Next.js config which is async
export default createJestConfig(config)
バックエンドで console.log が オブジェクトを [object] と表示してしまう。
console.dir(obj, { depth: null });
引用: https://zenn.dev/manabuyasuda/articles/d90758e4788bc1
● next.js app router での多言語(i18n)対応
https://nextjs.org/docs/app/building-your-application/routing/internationalization#resources
結構パッケージがあります。
)
next.js standalone
● next.js の standaloneモードを有効にしてビルドする
https://nextjs.org/docs/app/api-reference/next-config-js/output
next.config.js
/**
 * @type { import("next").NextConfig}
 */
const config = {
  output: 'standalone'
}
ビルド
npm run build
サーバースタート
node .next/standalone/server.js
ポートを指定してサーバースタート
HOSTNAME=localhost PORT=3030 node .next/standalone/server.js
2つのディレクトリをコピーしてあげる必要があります。
わかりやすく__を先頭につけて
__public
__static
フォルダにコピーすると混乱しないでしょう。 (別途、nginxの設定で 配信を定義する必要があります。)
static ディレクトリをコピーする
cp -r .next/static .next/standalone/__static
public ディレクトリをコピーする
cp -r public .next/standalone/__public
つまりstandaloneビルド実行してから、起動するには以下のコマンドでokです。
npm run build
cp -r .next/static .next/standalone/.next/static
cp -r public .next/standalone/public
HOSTNAME=localhost PORT=3000 node .next/standalone/server.js
.env.staging など、独自の .envファイルを使いたい場合は .next/standalone/.env.production へコピーします。
.env.staging を .next/standalone/.env.production に名前を変えてコピー
cp .env.staging .next/standalone/.env.production
sharp をインストールする
next/image を使っている場合は、sharp をインストールしてから再度 npm run build します。
npm i sharp
https://nextjs.org/docs/messages/sharp-missing-in-production
sharpをインストールしないと、コンソールにワーニングが出ます。
https://weseek.co.jp/tech/3656/
リモート画像の設定
https://nextjs.org/docs/app/building-your-application/optimizing/images
https://zenn.dev/the_fukui/articles/nextjs-arbitrary-image-path
.next/standaloneディレクトリが作成され、実行に必要な最小限のファイルがコピーされます。Dockerイメージを作成するような場合、この機能によってイメージサイズをかなり縮小できます。
standaloneを設定してyarn buildを行うと.next/standaloneディレクトリ配下に本番環境で必要な最小限のファイル群が集約されて生成されます。
(例外としてpublic,.next/staticディレクトリは.next/standaloneに含まれないため、必要な場合は明示的にCOPYする必要があります。)
ただし.next/staticとpublicはコピーされないため、自分で配置する必要があります。
さらにランタイムにexperimental-edgeを選んでいる場合は注意が必要です。
.next/standalone/serverで必要なファイルが足りない状態となります。
VercelがCDNに入れるべきと判断したファイルはとことん削られています。
それ以外にもnode_modulesの中の*.wasmもコピーされないので、必要とする場合は注意が必要です。
next.js アプリを https で起動する
● npm run dev で起動する開発サーバーのnext.js アプリを https で起動する
package.json に dev:https コマンドを追加
package.json
  "scripts": {
    "dev": "next dev",
    "dev:https": "next dev --experimental-https",
    "build": "next build",
    "start": "next start",
    "lint": "next lint"
  },
npm run dev:https
https://localhost:3001 にアクセスできることを確認します。
以上です。簡単ですね。
● npm run start で起動する開発サーバーのnext.js アプリを https で起動する
mkcert のインストール
brew install mkcert
現在の設定を見る
security dump-trust-settings
現時点で何も作成されていなければ、次のように帰ってきます
SecTrustSettingsCopyCertificates: No Trust Settings were found.
mkcert localhost で証明書の発行
mkcert localhost
The certificate is at "./localhost.pem" and the key at "./localhost-key.pem" ✅
next.js を起動
npm run build
npm run start
まずは http://localhost:3000/ アクセスできることを確認しておきます。
プロキシを起動
cd
npx local-ssl-proxy  --key localhost-key.pem  --cert localhost.pem  --source 3001  --target 3000
Started proxy: https://localhost:3001 → http://localhost:3000
アクセスの確認
https://localhost:3001 にアクセスできることを確認します。 以上です。
● npm run start で起動する開発サーバーのnext.js アプリを https://my-custom-hostname.local/ のような任意のホスト名で起動する
sudo vi /etc/hosts
127.0.0.1 my-custom-hostname.local
Macを再起動しておきます。
あとは次のコマンド実行します。
mkcertの作成
cd
mkcert my-custom-hostname.local
next.js の起動
npm run build
npm run start
プロキシの起動
cd
npx local-ssl-proxy  --key my-custom-hostname.local-key.pem  --cert my-custom-hostname.local.pem  --source 3001  --target 3000
アクセスの確認
http://my-custom-hostname.local:3000/ への アクセスを確認します
https://my-custom-hostname.local:3001/ への アクセスを確認します
Next.js のページが 「サーバー」/「クライアント」でどう動いているかを調べる
● Next.js のページが 「サーバー」/「クライアント」でどう動いているかを調べる
https://next-code-elimination.vercel.app/
左側がページのコンポーネント全て、右側がクライアントに渡されるコードです。
App Router導入後のNext.js開発におけるDead Code Eliminationの活用
● クライアント側だけで処理を行う。
isClient を 定義して、これを利用します
const isClient = typeof window !== 'undefined';
使い方
const isClient = typeof window !== 'undefined';

if ( isClient ){
  // クライアントだけで実行されるコード
}
共通関数として利用する場合はこのようにして定義しておくと良いでしょう
const isClient = () => typeof window !== 'undefined'
使い方
if ( isClient() ){
  // クライアントだけで実行されるコード
}
t3 stack (trpc) で Date型を扱う
● t3 stack (trpc) で Date型を扱う
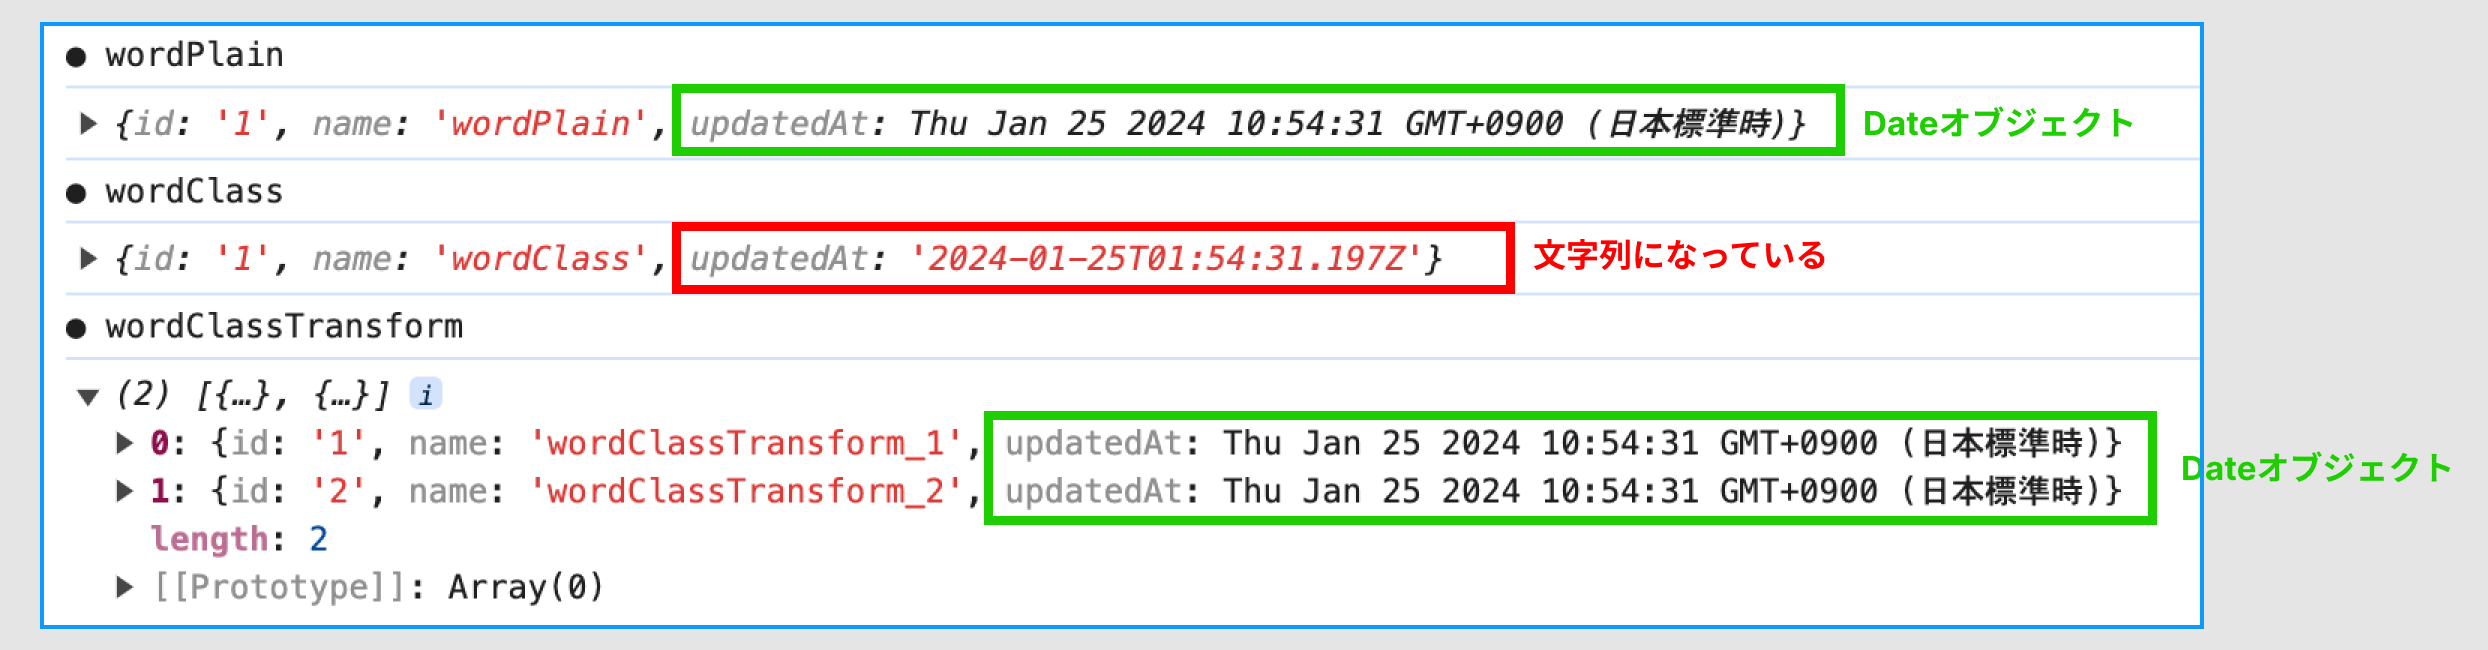
t3 stack (trpc) で Date型をそのまま 扱いたい時は superjson を使用すれば そのまま使えますが、 クラスインスタンスを 直接返す時はDate型は文字列にされてしまうので注意しましょう。
具体的には、以下の3つの挙動の違いがあります
・挙動まとめ
・ プレーンオブジェクトの中に Date型のプロパティを含めて返す → ✅ OK
・ クラスインスタンスの中に Date型のプロパティを含めて、クラスインスタンをそのまま返す。 → ❌NG
・ クラスインスタンスの中に Date型のプロパティを含めて class-transformer でプレーンオブジェクトに変換して返す。 → ✅ OK
・trpcサーバー側コード
npm i class-transformer reflect-metadata
export const postRouter = createTRPCRouter({
  wordPlain: publicProcedure
    .input(z.object({ name: z.string() }))
    .query(({ input }) => {
      return {
        id: "1",
        name: input.name,
        updatedAt: new Date(),
      };
    }),

  wordClass: publicProcedure
    .input(z.object({ name: z.string() }))
    .query(({ input }) => {
      const sampleClass = new SampleClass({
        id: "1",
        name: input.name,
      });
      return sampleClass;
    }),

  wordClassTransform: publicProcedure
    .input(z.object({ name: z.string() }))
    .query(({ input }) => {
      const sampleClassList = [
        new SampleClass({
          id: "1",
          name: `${input.name}_1`,
        }),
        new SampleClass({
          id: "2",
          name: `${input.name}_2`,
        }),
      ];

      return instanceToPlain(sampleClassList);
    }),
・クライアント側
  const { data: wordPlain } = apiReact.post.wordPlain.useQuery({
    name: "wordPlain",
  });

  const { data: wordClass } = apiReact.post.wordClass.useQuery({
    name: "wordClass",
  });

  const { data: wordClassTransform } =
    apiReact.post.wordClassTransform.useQuery({
      name: "wordClassTransform",
    });


  useEffect(() => {
    if (!wordPlain) return;
    if (!wordClass) return;

    console.log("● wordPlain");
    console.log(wordPlain);

    console.log("● wordClass");
    console.log(wordClass);

    console.log("● wordClassTransform");
    console.log(wordClassTransform);

  }, [wordPlain, wordClass, wordClassTransform]);
・結果
)
next.js で class-transformer と class-validator を使用する
● next.js で class-transformer と class-validator を使用する
npm i class-transformer class-validator reflect-metadata
tsconfig.json
{
  "compilerOptions": {
    "emitDecoratorMetadata": true,
    "experimentalDecorators": true,
Cloud Run へ Next.js アプリをデプロイ ( Dockerfile 使用 )
● 1. Dockerの対応
1. next.config.mjs の修正
const nextConfig = {
  output: 'standalone',
};
2. Dockerfile の追加
Dockerfile
FROM node:18-alpine AS base

# Install dependencies only when needed
FROM base AS deps
# Check https://github.com/nodejs/docker-node/tree/b4117f9333da4138b03a546ec926ef50a31506c3#nodealpine to understand why libc6-compat might be needed.
RUN apk add --no-cache libc6-compat
WORKDIR /app

# Install dependencies based on the preferred package manager
COPY package.json yarn.lock* package-lock.json* pnpm-lock.yaml* ./
RUN \
  if [ -f yarn.lock ]; then yarn --frozen-lockfile; \
  elif [ -f package-lock.json ]; then npm ci; \
  elif [ -f pnpm-lock.yaml ]; then corepack enable pnpm && pnpm i --frozen-lockfile; \
  else echo "Lockfile not found." && exit 1; \
  fi


# Rebuild the source code only when needed
FROM base AS builder
WORKDIR /app
COPY --from=deps /app/node_modules ./node_modules
COPY . .

# Next.js collects completely anonymous telemetry data about general usage.
# Learn more here: https://nextjs.org/telemetry
# Uncomment the following line in case you want to disable telemetry during the build.
# ENV NEXT_TELEMETRY_DISABLED 1

RUN \
  if [ -f yarn.lock ]; then yarn run build; \
  elif [ -f package-lock.json ]; then npm run build; \
  elif [ -f pnpm-lock.yaml ]; then corepack enable pnpm && pnpm run build; \
  else echo "Lockfile not found." && exit 1; \
  fi

# Production image, copy all the files and run next
FROM base AS runner
WORKDIR /app

ENV NODE_ENV production
# Uncomment the following line in case you want to disable telemetry during runtime.
# ENV NEXT_TELEMETRY_DISABLED 1

RUN addgroup --system --gid 1001 nodejs
RUN adduser --system --uid 1001 nextjs


# Set the correct permission for prerender cache
RUN mkdir .next
RUN chown nextjs:nodejs .next

# Automatically leverage output traces to reduce image size
# https://nextjs.org/docs/advanced-features/output-file-tracing
COPY --from=builder --chown=nextjs:nodejs /app/.next/standalone ./
COPY --from=builder --chown=nextjs:nodejs /app/.next/static ./.next/static
COPY --from=builder /app/public ./public

USER nextjs

EXPOSE 3000

ENV PORT 3000
# set hostname to localhost
ENV HOSTNAME "0.0.0.0"

# server.js is created by next build from the standalone output
# https://nextjs.org/docs/pages/api-reference/next-config-js/output
CMD ["node", "server.js"]
このDockerfileはマルチステージビルドです。 マルチステージビルドを行うことで以下のファイル群を最終生成物に含めないようにしています。
1. 依存関係をインストールする際に使用されるパッケージマネージャー自体 (npm、yarn、pnpm など)
2. ビルドツール (webpack、babel など)
3. コンパイル済みのソースコードではなく、アプリケーションのソースコード
4. 各種開発ツール (linter、テストフレームワークなど)
5. パッケージインストーラ関連の一時ファイル (キャッシュディレクトリなど)
3. .dockerignore の追加
.dockerignore
Dockerfile
.dockerignore
node_modules
npm-debug.log
README.md
.next
.git
動作確認
docker build -t my-app  .
docker run -p 3000:3000 my-app
● 2. Google Cloud へログインしプロジェクトを作成する
「Cloud Run を選択」→「サービスを作成 をクリック」
「GitHubのアイコンを選択」→「CloudBuildの設定をクリック」
・リポジトリとブランチを選択
・ビルドタイプは「Dockerfile」を選択
・「コンテナ、ボリューム、ネットワーキング、セキュリティ」をクリックしてコンテナポートを「8080 → 3000」に変更
・「変数とシークレット」タブを選択し、「➕変数を追加」ボタンを押して環境変数を追加します
3. トリガーの実行に失敗: ソースコードをビルドまたはデプロイできませんでした。また、ログが見つかりません。 エラーになる場合
・CLOUD BUILD へ移動しメニューから「トリガー」を選択
・リストの右側「実行」から「トリガーの実行」
・おそらく上にエラーメッセージが出るのでその中のリンク
https://console.developers.google.com/apis/api/iam.googleapis.com/overview?project=XXXXXXX をブラウザに入力
・Identity and Access Management (IAM) API を「有効にする」
・サイド、先ほどのCLOUD BUILDリストの右側「実行」から「トリガーの実行」を押す
ビルドは 10分程度かかります!待ちましょう!
4. Firebase Hosting の Cloud Run インテグレーション機能を利用する
Firebase Hosting と接続することで・CDN + カスタム ドメインの機能を利用することが可能となります
Cloud Run > 対象のアプリの詳細画面 > 統合(プレビュー) > インテグレーションを追加をクリック
  ↓
Firebase Hosting をクリック
(注意)Cloud Run でカスタムドメインを使うとレイテンシーが高くなる
カスタムドメインを使用すると通信が Client -> ghs.googlehosted.com -> Cloud Run になるのですが ghs.googlehosted.com がアメリカにあります。
Client と Cloud Run が日本にあるとすると接続が 日本→アメリカ→日本 になってしまい遅くなります。
Next.js App Router@14 の サーバーサイド fetch のキャッシュについて
● Next.js App Router の サーバーサイド fetch のキャッシュについて
該当するバージョンは nextjs@14です。
● A. Next.js の fetch 関数を使用している場合(キャッシュが自動で有効になる)
この例では 3600秒(1時間)サーバーサイドでキャッシュが有効になります。
page.tsx
/**
 * Route Segment Config
 */
export const revalidate = 3600

export default async function Page() {
  fetch('https://...')
● B. fetch 以外の関数でデータ取得している場合の cache について
unstable_cache を使ってキャッシュ関数を合成することで、キャッシュに対応できるようになります。
公式: https://nextjs.org/docs/app/api-reference/functions/unstable_cache
page.tsx
/**
 * Route Segment Config
 */
export const revalidate = 3600

/**
 * cached Function
 */
const getUserCached = unstable_cache(
  (id:string) => { return getUser(id) } // データ取得関数をここに
  [keyParts],
)

export default async function Page() {
  const user = getUserCached('xxxxxxxx')
● Next.js App Router の Route Segment Config について
Route Segment Configは以下のデフォルト値を持ちます。
export const dynamic = 'auto'
export const dynamicParams = true
export const revalidate = false
export const fetchCache = 'auto'
export const runtime = 'nodejs'
export const preferredRegion = 'auto'
export const maxDuration = 5
| Option | Type | 説明 |
|---|---|---|
| dynamic | 'auto' | 'force-dynamic' | 'error' | 'force-static' | 'auto' |
| dynamicParams | boolean | true |
| revalidate | false | 0 | number | false |
| fetchCache | 'auto' | 'default-cache' | 'only-cache' | 'force-cache' | 'force-no-store' | 'default-no-store' | 'only-no-store' | 'auto' |
| runtime | 'nodejs' | 'edge' | 通常はnodejs。Cloudflareなどにデプロイする場合は edge |
| preferredRegion | 'auto' | 'global' | 'home' | string | string[] | 'auto' |
| maxDuration | number | サーバーの最大実行時間。これを超えるとエラーとなる。デプロイプラットフォームによって自動設定されます。 |
dynamic = 'force-static'の効果について
export const dynamic = 'force-static'を設定していると、仮にDynamic APIを使用していたとしても、それらは空の値として扱われ、ページは強制的に静的レンダリングされます。
Dynamic API の例
cookies()
headers()
searchParams
これらを使っているときにそのページは Dynamic になります。
● Next.js の ondemand ISR について
ondemand ISR を有効にするには
以下を追加して ondemand ISR を有効にする
export async function generateStaticParams() {
  return []; // 空の配列でも可
}
(ページが Dynamic なときにこれを指定するとエラーになります。)
または
export const dynamic = 'force-static';
検証方法
レスポンスヘッダに x-nextjs-cache があれば ISR です。

)
Cloudflare へ next.js app router アプリをデプロイ
● npm create cloudflare コマンドを使用してアプリの作成から開始する場合
・アプリ初期化( +自動デプロイ )
「アプリ名を入力」→「Website or web app を選択」→「Nextを選択」
を進むと、next.js のアプリ作成初期画面になるので、いつもの通りオプションを選択していく。
あとはデプロイまで自動で行ってくれます。
以下の画面が出れば成功です。
├  SUCCESS  View your deployed application at https://YOUR-APP-NAME.pages.dev
│
│ Navigate to the new directory cd YOUR-APP-NAME
│ Run the development server npm run pages:dev
│ Deploy your application npm run pages:deploy
│ Read the documentation https://developers.cloudflare.com/pages
│ Stuck? Join us at https://discord.gg/cloudflaredev
APIを利用する場合は export const runtime = 'edge' をAPIの route.ts に記述する必要があります
例: /src/app/api/helloworld/route.ts
export const runtime = 'edge' // 'nodejs' (default) | 'edge'
エッジランタイムでは Node API は動かないので注意
fsなどの Node依存なAPIは使用できない
使用できるのはWeb標準API(DOMを除くブラウザで操作できるAPI)
・アプリの修正後の手動デプロイ
手動デプロイ は以下のコマンドです。
npm run pages:deploy
● すでにあるアプリをGitHubへのpushでデプロイする場合
・Cloudflare管理画面から以下の操作をする
「Workers & Pages」→「Pagesタブを選択」→「Gitに接続ボタンを押す」
あとはメニューに沿ってリポジトリとブランチを選択するだけでokです。
next.js で .env.staging を使用したい
dotenv-cli 、 env-cmd どちらか好きな方を使用しましょう
● A. dotenv-cli を使って Next.js のビルドで .env.staging を使用できるようにする
・1. dotenv-cli のインストール
npm i -D dotenv-cli
・2. .env.staging ファイルを指定しながら staging用のビルドコマンドを実行する
npx dotenv -e .env.staging -- next build
.env.production も .env.prod に変更しておいて、明示的に指定してやるとうっかり読み込まれることがなくなるのでおすすめです。
dotenv で .env.prod を指定してビルド
mv .env.production .env.prod
npx dotenv -e .env.prod -- next build
Dockerfile で .env.prod を .env にコピーしてからビルド
RUN COPY .env.prod  .env && \
    npm run build
● B. env-cmd を使って Next.js のビルドで .env.staging を使用できるようにする
・1. env-cmd のインストール
npm i -D env-cmd
・2. .env.staging ファイルを指定しながら staging用のビルドコマンドを実行する
env-cmd -f .env.staging next build
Next.jsのApp routerでtRPCサーバを立てて、サーバーサイド、クライアントサイドから利用する
● ファイル構成
next.js の appルーターでエンドポイントを1つ作って、あとは trpc の中で分岐させるので作るのもはがすのも簡単です。
├── app
│       └── api
│               └── trpc
│                   └── [trpc]
│                       └── route.ts (エンドポイント /api/trpc/ を処理する next.js app ルーターの route.ts)
└── trpc
        ├── client
        │       ├── TrpcProvider.tsx
        │       ├── client.ts
        │       └── serverSideClient.ts
        └── server
            ├── context.ts
            ├── routers
            │       ├── index.ts
            │       ├── userRouter.ts (ユーザーに関するルーティング)
            │       └── postRouter.ts (投稿に関するルーティング)
            └── trpc.ts
● npmパッケージのインストール
npm i @trpc/server @trpc/client @trpc/react-query @trpc/next @tanstack/react-query@^4.0.0 zod
npm i -D @tanstack/react-query-devtools@4.35.0
● server
src/trpc/server/trpc.ts
import { initTRPC } from "@trpc/server";

const t = initTRPC.create();

export const router = t.router;
export const publicProcedure = t.procedure;
src/trpc/server/routers/index.ts
import { z } from "zod";

import { publicProcedure, router } from "../trpc";

export const appRouter = router({
  helloUser: publicProcedure
    .input(
      z.object({
        userName: z.string(),
      }),
    )
    .mutation(async (opts) => {
      return { text: `Hello ${opts.input.userName}` };
    }),
  hello: publicProcedure.query(async () => {
    return { text: "Hello" };
  }),
  helloText: publicProcedure
    .input(
      z.object({
        text: z.string(),
      })
    )
    .query(async (opts) => {
      return { text: `Hello ${opts.input.text}` };
    }),
});

export type AppRouter = typeof appRouter;
いわゆる GET は.query() POST は .mutation() になります。
● client
src/trpc/client/client.ts
trpc は reactQuery で使用します。
trpcClient は await を行いたい時など直接リクエストする時に使用します。
import {
  createTRPCProxyClient,
  createTRPCReact,
  httpBatchLink,
} from "@trpc/react-query";

import { type AppRouter } from "../server/routers";

export const trpc = createTRPCReact<AppRouter>({});

export const trpcClient = createTRPCProxyClient<AppRouter>({
  links: [
    httpBatchLink({
      url: `${process.env.NEXT_PUBLIC_BACKEND_API_BASE_URL}/api/trpc`,
    }),
  ],
});
src/trpc/client/serverSideClient.ts
import { httpBatchLink } from "@trpc/client";

import { appRouter } from "../server";

export const serverSideClient = appRouter.createCaller({
  links: [
    httpBatchLink({
      url: "http://localhost:3000/api/trpc",
    }),
  ],
});
src/trpc/client/TrpcProvider.tsx
"use client";
import { QueryClient, QueryClientProvider } from "@tanstack/react-query";
import { httpBatchLink } from "@trpc/client";
import React, { useState } from "react";

import { trpc } from "./client";

export default function TrpcProvider({
  children,
}: {
  children: React.ReactNode;
}) {
  const [queryClient] = useState(() => new QueryClient({}));
  const [trpcClient] = useState(() =>
    trpc.createClient({
      links: [
        httpBatchLink({
          url: "http://localhost:3000/api/trpc",
        }),
      ],
    }),
  );
  return (
    <trpc.Provider client={trpcClient} queryClient={queryClient}>
      <QueryClientProvider client={queryClient}>{children}</QueryClientProvider>
    </trpc.Provider>
  );
}
● TrpcProvide を設定する
src/app/layout.tsx
TrpcProvider を以下のように追加します
import TrpcProvider from "@/trpc/client/TrpcProvider";

  return (
    <html lang="en">
      <body className={inter.className}>
        <TrpcProvider>{children}</TrpcProvider>
      </body>
    </html>
  );
● クライアントサイドで取得する(React Query)
クライアントサイドでAPI hello を叩くには trpc.hello.useQuery() を実行します。
src/features/hello/Hello.tsx
"use client";

import { FC } from "react";
import { trpc } from "@/trpc/client/client";

export const HelloComponent: FC = () => {
  const { data } = trpc.hello.useQuery();

  return (
    <div>
      <h1>HelloComponent</h1>
      <div>{JSON.stringify(data)}</div>
    </div>
  );
};
引数を受け取る helloText はこのようにして呼び出します。
const { data } = trpc.helloText.useQuery({ text: 'ユーザー名' });
コンポーネントマウント時ではなく、ステートに何か値が入った時にリクエストする場合は次のようにします
  const [text, setText] = useState<string>("")
  const { data } = trpc.helloText.useQuery(
    { text: text },
    {
      enabled: text !== "", // text が "" でない場合にのみクエリを有効にする
    },
  )

// 任意のタイミングで setText() して text に値をセットすると、APIコール発火
● クライアントサイドで取得する(直接)
どうしても await したい時はこちらの方法も有効です。
import { trpcClient } from "@/trpc/client/client"

const result = await trpcClient.hello({ text:'直接取得' })
● サーバーサイドで取得する
サーバーサイドでAPI helloUser を叩くには await serverSideClient.helloUser() を実行します。
src/app/hello-server/page.tsx
import { serverSideClient } from "@/trpc/client/serverSideClient";

const HelloServerPage = async () => {
  const data = await serverSideClient.helloUser({
    userName: "テスト太郎",
  });

  return <>{data.text}</>;
};

export default HelloServerPage;
● サーバーサイドとクライアントサイドの取得の違い
例えば以下のように 独自クラスUser を返す trpcエンドポイントを作成したとします。
  getUser: publicProcedure
    .input(z.object({ name: z.string() }))
    .query(({ input }) => {
      return new User({
        id: "1",
        name: input.name,
      });
    }),
・サーバーサイドで取得した場合は独自クラスがそのまま返されます
console.log(user)
(updatedAt は Dateオブジェクト)
User {
  id: '1',
  name: 'server side',
  updatedAt: 2024-01-23T05:53:31.525Z
}
・クライアントサイドで取得した場合は独自クラスが普通のオブジェクトに変換されて返されます
console.log(user)
(updatedAt は 文字列)
{
    "id": "1",
    "name": "hoge fuga",
    "updatedAt": "2024-01-23T06:01:58.341Z"
}
● jwtトークン認証する
https://trpc.io/docs/server/authorization#create-context-from-request-headers
次の手順で認証済みルートを作成します。
- クライアント側で、ログインしていれば { Authorization: `Bearer ${token}` } をしていなければ {} ヘッダを送信するようにします。
- サーバー側で、受け取ったトークンを検証します。(firebase-admin など)
- 「誰でもアクセス可能な publicProcedure」「ログイン済みユーザーのみアクセス可能な protectedProcedure」を作成します。
- 制限をかけたいルートは protectedProcedure を使ってルーティングを定義します。
● エンドポイントの階層化 (サブルーター)
/api/trpc/user.hello を定義してみます。
import { router, publicProcedure } from '@trpc/server';

// Userサブルーター
const userRouter = router({
  hello: publicProcedure.query(async () => {
    return { text: "Hello from user" };
  }),
});

// メインアプリケーションルーター
export const appRouter = router({
  user: userRouter, // userサブルーターを追加
  myInfo: publicProcedure.query(async () => {
    return { text: "myInfo" };
  }),
});
https://trpc.io/docs/server/merging-routers
● エンドポイントに rate limit を設定する
https://github.com/OrJDev/trpc-limiter/tree/main/packages/memory
● react__WEBPACK_IMPORTED_MODULE_3__.createContext) is not a function エラーが出る場合

もしかすると 'user client' つけ忘れかもしれないので確認しましょう。
)
next.js (app router) で 現在のURLパス、クエリパラメーターを取得する
● next.js (app router) で 現在のURLパス、クエリパラメーターを取得する
'use client'

import { usePathname } from 'next/navigation';

// http://localhost:3001/test1?foo=bar へアクセスした場合 「/test1」 になります
const pathname = usePathname() // /test1
app router の API機能(Route Handlers)/ tRPC でエンドポイントを作成する
● /api/hoge のエンドポイントを作成する
(GET) http://localhost:3000/api/hoge?name=hoge で、テキスト Hello (hoge) ! を返すAPIを実装する (next.js)
- ファイル名 route.ts は決まっています。
- ディレクトリ名は任意ですが、同じ階層に page.tsx と route.ts があるとエラーになるので、 /app/api を起点にして被らないようにします
- GETメソッドの時は function GET() を作成します。
src/app/api/hoge/route.ts
import { NextRequest, NextResponse } from "next/server"

type ApiErrorType = {
  error: string
  message: string
}

type GetResultType = {
  message: string
  accessDate: string
}

export function GET(
  request: NextRequest,
): NextResponse<ApiErrorType> | NextResponse<GetResultType> {
  const searchParams = request.nextUrl.searchParams
  const name = searchParams.get("name")

  if (!name) {
    return NextResponse.json(
      {
        error: "Bad Request",
        message: "Parameter 'name' is missing or invalid format",
      },
      { status: 400, headers: { "Content-Type": "application/json" } },
    )
  }

  return NextResponse.json({
    message: `hello, (${name})!`,
    accessDate: new Date().toLocaleString("ja-JP", { timeZone: "Asia/Tokyo" }),
  })
}
● app router と tRPC を使ってエンドポイントを作成する
次のエンドポイントを作成します。
(GET) http://localhost:3000/api/trpc/helloTrpc
(POST) http://localhost:3000/api/trpc/helloUser  送信する Body「{"userName": "foobar"}」
1. npmパッケージのインストール
npm install @trpc/server @trpc/client @trpc/react-query @trpc/next @tanstack/react-query zod
// next14の場合 npm install @trpc/server @trpc/client @trpc/react-query @trpc/next @tanstack/react-query@^4.0.0 zod
2. server/ フォルダに trpc設定ファイルを作成
1. src/server/trpc.ts を作成します。
import { initTRPC } from "@trpc/server";

const t = initTRPC.create();

export const router = t.router;
export const publicProcedure = t.procedure;
2. src/server/index.ts を作成します。
import { z } from "zod";

import { publicProcedure, router } from "./trpc";


export const appRouter = router({
  helloTrpc: publicProcedure.query(async () => {
    return { text: "Hello" };
  }),
  helloUser: publicProcedure
    .input(
      z.object({
        userName: z.string(),
      }),
    )
    .mutation(async () => {
      return { text: "Hello" };
    }),
});

export type AppRouter = typeof appRouter;
3. src/app/api/trpc/[trpc]/route.ts を作成します。
import { fetchRequestHandler } from "@trpc/server/adapters/fetch";

import { appRouter } from "@/server";

const handler = (req: Request) =>
    fetchRequestHandler({
        endpoint: "/api/trpc",
        req,
        router: appRouter,
        createContext: () => ({}),
    });

export { handler as GET, handler as POST };
これだけでOKです。
3. vs code Thunder Client でアクセスを試す

● app router の Route Handlers のレスポンスで データベースを使用する
prisma または drizzle を使用すると良いでしょう。
https://www.prisma.io/docs/concepts/more/comparisons/prisma-and-drizzle
)
Next.js app router で プレーンなjson以外のクラスを Server → Client へ渡す
● Next.js app router で プレーンなjson以外のクラスを Server → Client へ渡す
● superjsonのインストール
npm i superjson@1
npm i next-superjson-plugin
next.config.js
/** @type {import('next').NextConfig} */
const nextConfig = {
  experimental: {
    swcPlugins: [["next-superjson-plugin", {}]],
  },
}

module.exports = nextConfig
● app router のサーバーサイドからクライアントコンポーネントへ Date オブジェクトを渡す
data-superjson を加えて渡します。
page.tsx
export default async function Page({ params }: PageProps) {
  const date = new Date()

  return (
    <MyClientComponent
      date={date}
      data-superjson
    />
  )
}
デフォルトで渡せるオブジェクトは以下のみです
undefined
bigint
Date
RegExp
Set
Map
Error
URL
● 独自のクラスを渡す
superjson の registerClass メソッドを使って、独自のクラスのシリアライズ方法とデシリアライズ方法を定義します。
import superjson from 'superjson';

class MyCustomClass {
  constructor(public value: string) {}

  // このクラス固有のメソッドなど
}

// MyCustomClass をシリアライズおよびデシリアライズする方法を定義
superjson.registerClass(MyCustomClass, {
  // オブジェクトをシリアライズする方法
  serialize: (instance) => instance.value,
  // シリアライズされたデータをオブジェクトにデシリアライズする方法
  deserialize: (value) => new MyCustomClass(value),
});

const instance = new MyCustomClass('Hello, World!');

// シリアライズ
const jsonString = superjson.stringify(instance);

// デシリアライズ
const newInstance = superjson.parse(jsonString);

console.log(newInstance); // MyCustomClass { value: 'Hello, World!' }
next.js アプリに typescript で jest を記述する。環境変数を読み込ませる
● 新しいやり方
(色々質問されますか 全て エンターを押してデフォルト値を設定します)
npm init jest@latest
npm install -D jest jest-environment-jsdom @testing-library/react @testing-library/jest-dom @types/jest
npm i -D ts-node
jest.config.ts
import type { Config } from 'jest'
import nextJest from 'next/jest.js'

const createJestConfig = nextJest({
  dir: './src/',
})

// custom config
const config: Config = {
  coverageProvider: 'v8',
  testEnvironment: 'jsdom',
}

export default createJestConfig(config)
ts-nodeを 入れたくない場合は、設定ファイルを .js にします。
jest.config.js
const nextJest = require('next/jest')

/** @type {import('jest').Config} */
const createJestConfig = nextJest({
  // Provide the path to your Next.js app to load next.config.js and .env files in your test environment
  dir: './',
})

// Add any custom config to be passed to Jest
const config = {
  coverageProvider: 'v8',
  testEnvironment: 'jsdom',
}

module.exports = createJestConfig(config)
● Next.js の createJestConfig結果を調べる
async function logJestConfig() {
  const jestConfig = await createJestConfig(config)();
  console.log('● createJestConfig結果');
  console.log(JSON.stringify(jestConfig, null, 2));
}
logJestConfig().catch(console.error);
・createJestConfig() 関数を実行して生成される設定はこのようになります。
{
  moduleNameMapper: {
    '^.+\\.module\\.(css|sass|scss)$': '<YOUR-PROJECT-PATH>/node_modules/next/dist/build/jest/object-proxy.js',
    '^.+\\.(css|sass|scss)$': '<YOUR-PROJECT-PATH>/node_modules/next/dist/build/jest/__mocks__/styleMock.js',
    '^.+\\.(png|jpg|jpeg|gif|webp|avif|ico|bmp)$': '<YOUR-PROJECT-PATH>/node_modules/next/dist/build/jest/__mocks__/fileMock.js',
    '^.+\\.(svg)$': '<YOUR-PROJECT-PATH>/node_modules/next/dist/build/jest/__mocks__/fileMock.js',
    '@next/font/(.*)': '<YOUR-PROJECT-PATH>/node_modules/next/dist/build/jest/__mocks__/nextFontMock.js',
    'next/font/(.*)': '<YOUR-PROJECT-PATH>/node_modules/next/dist/build/jest/__mocks__/nextFontMock.js',
    'server-only': '<YOUR-PROJECT-PATH>/node_modules/next/dist/build/jest/__mocks__/empty.js'
  },
  testPathIgnorePatterns: [ '/node_modules/', '/.next/' ],
  transform: {
    '^.+\\.(js|jsx|ts|tsx|mjs)$': [
      '<YOUR-PROJECT-PATH>/node_modules/next/dist/build/swc/jest-transformer.js',
      [Object]
    ]
  },
  transformIgnorePatterns: [ '/node_modules/', '^.+\\.module\\.(css|sass|scss)$' ],
  watchPathIgnorePatterns: [ '/.next/' ]
}
● Next.js の jest でカスタムトランスフォーマーを使用する
カスタムトランスフォーマー custom-transformer.js を使用してみます。
transform: { } のようにオブジェクトを渡す設定の場合は ...baseConfig.transform, を渡す必要があります。
const nextJest = require('next/jest')

/** @type {import('jest').Config} */
const createJestConfig = nextJest({
  // Provide the path to your Next.js app to load next.config.js and .env files in your test environment
  dir: "./",
})

/**
 * jest設定
 */
async function generateJestConfig() {
  const baseConfig = await createJestConfig({})();
  const customConfig = {
    ...baseConfig,
    coverageProvider: "v8",
    testEnvironment: "jsdom",
    transform: {
      "^.+\\.(ts|js)$": "<rootDir>/custom-transformer.js",
      ...baseConfig.transform,
    },
  };
  return customConfig;
}


/**
 * デバッグ表示
 */
async function showJestConfig() {
  const config = await generateJestConfig()
  console.log( "● jest settings" );
  console.log(JSON.stringify(config, null, 2));
}
showJestConfig()

module.exports = generateJestConfig;
● 古いやり方
● jestのインストール
npm install -D jest @types/jest ts-jest
● jestの設定
jest.config.js
module.exports = {
  preset: "ts-jest",
  testEnvironment: "node",
  setupFilesAfterEnv: ["<rootDir>/jest.setup.js"],
}
● jest 実行時に .env.development ファイルを読み込ませる
jest.setup.js
require("dotenv").config({ path: ".env.development" })
● ちなみに、ts-jest はもう遅くないみたいです。↓
sizuhiko - Technote - ts-jest が esbuild/swc をトランスフォーマーに使って高速化していた
ブラウザ環境か node.js 環境かを判別する
● ブラウザ環境か node.js 環境かを判別する
process.title で判別します
・ブラウザの場合にtrueが返る関数
function isBrowser(){
    return process.title === 'browser'
}
process.title の戻り値
// ブラウザ の場合
"browser"

// nodejs の場合
"/PATH/TO/YOR/NODEJS/versions/16.0.0/bin/node"
next.js で tailwind.css が効かない時に調べるところ
● 1. next.config.js を調べる
swcMinify:true があると効かないようです。
next.config.js
/** @type {import('next').NextConfig} */
const nextConfig = {
  reactStrictMode: true,
  // swcMinify: false, // ● この行は必ず削除しましょう
}
module.exports = nextConfig
● 2. tailwind.config.ts を調べる
content の リストの中で使用されているクラスがビルド時に使用できるようになるので、もし反映されないコンポーネントが リストにない場合はそこに追加しましょう。
tailwind.config.ts
import type { Config } from 'tailwindcss'

const config: Config = {
  content: [
    './src/features/**/*.{js,ts,jsx,tsx,mdx}', // ● /features/ 以下を追加する場合はこのように追加します
    './src/pages/**/*.{js,ts,jsx,tsx,mdx}',
    './src/components/**/*.{js,ts,jsx,tsx,mdx}',
    './src/app/**/*.{js,ts,jsx,tsx,mdx}'
  ],
  theme: {
    extend: {
      backgroundImage: {
        'gradient-radial': 'radial-gradient(var(--tw-gradient-stops))',
        'gradient-conic': 'conic-gradient(from 180deg at 50% 50%, var(--tw-gradient-stops))'
      }
    }
  },
  plugins: []
}
export default config
next.js の Image の fallback
import { useEffect, useState } from 'react'
import Image from 'next/image'

export const FallbackImage = ({ src, ...rest }) => {
  const [imgSrc, setImgSrc] = useState(src)

  useEffect(() => {
    setImgSrc(src)
  }, [src])

  return (
    <Image
      {...rest}
      src={imgSrc ? imgSrc : '/images/not-found.png'}
      onError={() => {
        setImgSrc('/images/not-found.png')
      }}
    />
  )
}
Next.js で css module を使用する
● 1. css module を使用する
sample.module.css
.btnRed {
    background-color: red;
    color: white;
}
コンポーネントでの使用
import styles from "@/styles/common.module.css";

return (
    <button className={styles.btnRed}>ボタン</button>
)
● 2. css module で scssを使用する
・sass のインストール
npm i sass -D
あとはファイル名を sample.module.scss のように拡張子 .scss にするだけです。
● 3. Typescript で css module の scssを使用する
コンポーネントでの使用
import styles from "@/styles/common.module.css";
return (
// 存在しないクラス .hogehoge でエラーが出ない
<button className={styles.hogehoge}>ボタン</button>
)
・css modules に 型をつける typed-scss-modulesのインストール
typed-scss-modulesのインストール
npm i typed-scss-modules -D
vi typed-scss-modules.config.ts
以下の内容で保存します
export const config = {
exportType: 'default',
nameFormat: 'none',
implementation: 'sass'
}
型生成コマンド
npx typed-scss-modules src
・Commandクリックで css modules に ジャンプできる happy-css-modules のインストール
happy-css-modules のインストール
npm i -D happy-css-modules
型生成コマンド
npx hcm 'src/**/*.module.{css,scss,less}'
next.js で .envにtypescript 型定義をつける
src/types/env.d.ts ( ファイル名やディレクトリはどこでもokです )
declare namespace NodeJS {
interface ProcessEnv {
readonly APP_NAME: string;
readonly NEXT_PUBLIC_APP_NAME: string;
readonly DB_CONNECTION: string;
readonly DB_HOST: string;
readonly DB_PORT: string;
readonly DB_DATABASE: string;
readonly DB_USERNAME: string;
readonly DB_PASSWORD: string;
}
}
.env
# APP
APP_NAME=アプリ名
NEXT_PUBLIC_APP_NAME=${APP_NAME}
npm script で ブラウザを開く
● npm script で ブラウザを開く
・1. npm-run-all , opener のインストール
npm install --save-dev npm-run-all opener
package.json
"scripts": {
"dev": "npm-run-all --parallel dev:next dev:browser",
"dev:next": "next dev -p 3999",
"dev:browser": "sleep 1 && opener http://localhost:3999/",
},
実行
npm run dev
npm-run-allのオプション
順次実行
「npm-run-all --serial」または「npm-run-all -s」または「run-s」と記述します
並列実行
「npm-run-all --parallel」または「npm-run-all -p」または「run-p」と記述します
Next.js AppRouter で emotionを使う方法
● Next.js AppRouter で emotionを使う方法
新たに作成するアプリの場合は emotionのかわりに goober を使うという手もあります。
https://github.com/cristianbote/goober
・ next.jsアプリの初期化
npx create-next-app@latest
( app router を選択してアプリを新規作成します )
● emotion のインストール
・1. npm から emotion をインストール
npm install @emotion/react
・ 2. tsconfig の設定
{
"compilerOptions": {
// emotion
"jsx": "preserve",
"jsxImportSource": "@emotion/react",
・3. next.config.mjs の設定
/** @type {import('next').NextConfig} */
const nextConfig = {
compiler: {
emotion: true,
},
};
export default nextConfig;
・4. サーバーコンポーネントの先頭に pragma をつける
- src/app/layout.tsx
- src/app/page.tsx
いずれも先頭に以下を追加
/* @jsxImportSource react */
・5. クライアントコンポーネントの先頭に 'use client'; をつける
クライアントコンポーネントの先頭に以下を追加
'use client';
以上で動作します!
npm run dev
・ emotion を 使ったCSSスタイリングの例 (1. tsx に直接記述)
components/SampleCss.tsx
'use client';
import { css } from '@emotion/react';
import { FC } from 'react';
export const SampleCss: FC = () => {
return (
<div
css={css`
color: green;
font-size: 48px;
font-weight: bold;
`}
>
SampleCss
</div>
);
};
・ emotion を 使ったCSSスタイリングの例 (2. 変数を2つ定義して配列でマージする)
import { css } from '@emotion/react';
const fontLarge = css`
font-size: 48px;
`;
const colorGreen = css`
color: green;
`;
export default function Home() {
return (
<>
<div css={[fontLarge, colorGreen]}>home</div>
</>
);
}
・ emotion を 使ったCSSスタイリングの例 (変数定義時に他のスタイルを取り込む)
import { css } from '@emotion/react';
const fontLarge = css`
font-size: 48px;
`;
const myFont = css`
${fontLarge}
color: blue;
`;
export default function Home() {
return (
<>
<div css={myFont}>home</div>
</>
);
}
・ emotion を 使ったCSSスタイリングの例 (グローバルスタイルを 設定する)
import type { AppProps } from 'next/app';
import { css, Global } from '@emotion/react';
const globalStyle = css`
body {
font-family: 'Helvetica Neue', Arial, 'Hiragino Kaku Gothic ProN',
'Hiragino Sans', Meiryo, sans-serif;
}
`;
export default function App({ Component, pageProps }: AppProps) {
return (
<>
<Global styles={globalStyle}></Global>
<Component {...pageProps} />
</>
);
}
・ emotion を 使ったCSSスタイリングの例 (動的スタイル conditional style)
src/pages/index.tsx
import { useState } from 'react';
import { css } from '@emotion/react';
type MyFont = {
colored:boolean
}
export default function Home() {
const [colored, setColored] = useState<boolean>(false);
const myFont = ({ colored }:MyFont) => css`
border: solid 1px black;
border-radius: 10px;
padding: 16px;
cursor: pointer;
${colored &&
`
background-color: #413F42;
color: white;
`}
`;
return (
<>
<button
onClick={() => {
setColored(!colored);
}}
>
色変更
</button>
<div css={myFont({ colored: colored })}>home</div>
</>
);
}
・ emotion を 使ったCSSスタイリングの例 (styled-components のように設定する)
npm install @emotion/styled
こちらで css から js object に 変換します
https://transform.tools/css-to-js
1. SampleStyled.tsx(styled.div記法)
'use client';
import styled from '@emotion/styled';
const MyTitle = styled.div`
border: 10px solid blue;
padding: 2rem;
font-size: 3.5rem;
margin: 0px;
color: blue;
`;
export function SampleStyled() {
return <MyTitle as={'button'}>home</MyTitle>;
}
as={'button'} で 出力時にタグを div から button に変更しています
2. SampleStyled.tsx(className渡し記法)
import styled from '@emotion/styled';
import { FC, ComponentProps } from 'react';
type StylableFC = FC<ComponentProps<'div'>>;
const SampleStyled: StylableFC = ({ className }) => {
return <div className={className}>コンポーネントサンプル</div>;
};
export default styled(SampleStyled)`
margin: 16px 0;
background-color: #f6f6f6;
color: green;
padding: 20px;
border-radius: 8px;
font-size: 64px;
font-weight: bold;
`;
● react17 + emotion で知っておくと良いこと
react17 で emotionを動かすには
1. tsconfig.json
"jsx": "preserve",
"jsxImportSource": "@emotion/react",
2. コンポーネントファイルの先頭に jsxプラグマを追加
/** @jsxImportSource @emotion/react */
3. コンポーネントファイルの先頭に jsxプラグマを追加したくない場合はこちら
react-app-rewired を使用する場合
@craco/craco を使用する場合
https://qiita.com/y-suzu/items/2d3fcf5414f7b418f05a
https://emotion.sh/docs/@emotion/babel-preset-css-prop
https://qiita.com/xrxoxcxox/items/17e0762d8e69c1ef208f
● その他リンク
@emotion/reactでのスタイル指定方法 - Qiita
zustand
● zustandのインストール
npm i zustand
● zustand dev tools のインストール
とても便利なので、こちらから入れておきましょう
https://chrome.google.com/webstore/detail/redux-devtools/lmhkpmbekcpmknklioeibfkpmmfibljd?hl=ja
● storeの作成
src/stores/book.ts
import { create } from "zustand";
type BookStoreData = {
amount: number;
title: string;
};
const initialData: BookStoreData = {
amount: 0,
title: "",
};
interface BookStore {
book: BookStoreData;
updateAmount: (newAmount: number) => void;
updateTitle: (newTitle: string) => void;
fetchTitle: () => void;
}
export const useBookStore = create<BookStore>((set, get) => ({
book: { ...initialData },
updateAmount: (newAmount: number) => {
const amountState = get().book.amount;
const newBook: BookStoreData = {
amount: newAmount + amountState,
title: get().book.title,
};
set({ book: newBook });
},
updateTitle: (newTitle: string) => {
const titleState = get().book.title;
const newBook: BookStoreData = {
amount: get().book.amount,
title: newTitle,
};
set({ book: newBook });
},
fetchTitle: async () => {
await new Promise((resolve) => setTimeout(resolve, 2000));
const newBook: BookStoreData = {
amount: get().book.amount,
title: "fetched Title",
};
set({ book: newBook });
},
}));
● コンポーネントで使用する
ストア値の参照 : const book = useBookStore((state) => state.book);
アクションfetchTitle の呼び出し : const fetchTitle = useBookStore((state) => state.fetchTitle);
const BookSample = () => {
const book = useBookStore((state) => state.book);
const updateAmount = useBookStore((state) => state.updateAmount);
const updateTitle = useBookStore((state) => state.updateTitle);
const fetchTitle = useBookStore((state) => state.fetchTitle);
const inputRef = useRef<HTMLInputElement>(null);
useEffect(() => {
fetchTitle();
// eslint-disable-next-line react-hooks/exhaustive-deps
}, [fetchTitle]);
return (
<div>
<h1> BookTitle: {book.title} </h1>
<h1> Books: {book.amount} </h1>
<button onClick={() => updateAmount(10)}> Update Amount </button>
<div>
<input type="text" ref={inputRef} />
<button
onClick={() =>
updateTitle(inputRef.current ? inputRef.current.value : "")
}
>
Update Text
</button>
</div>
</div>
);
};
すでに作成ずみの Next.js アプリを Firebase Hosting へデプロイする
● すでに作成ずみの Next.js アプリを Firebase Hosting へデプロイする
( SSR は Firebase Functionsへ。)
1. アプリの作成
npx create-next-app@latest --use-npm <アプリ名>
2. firebase コンソールからプロジェクトを作成する
https://console.firebase.google.com/ からプロジェクトを作成します。プロジェクト名はアプリ名と同じとしておくと良いでしょう。
3. package.json を変更する
以下をそれぞれの場所に追記します。
{
"main": "firebaseFunctions.js",
"scripts": {
"serve": "npm run build && firebase emulators:start --only functions,hosting",
"shell": "npm run build && firebase functions:shell",
"deploy": "firebase deploy --only functions,hosting",
"logs": "firebase functions:log"
},
"dependencies": {
"firebase-admin": "^9.4.2",
"firebase-functions": "^3.13.1",
},
"devDependencies": {
"firebase-functions-test": "^0.2.3",
"firebase-tools": "^9.3.0"
}
}
その後にパッケージをインストールします
npm install
4. .firebaserc を追加する
vi .firebaserc
{
"projects": {
"default": "<アプリ名>"
}
}
5. firebaseFunctions.js を追加する
vi firebaseFunctions.js
const { https } = require('firebase-functions')
const { default: next } = require('next')
const nextjsDistDir = './.next/';
const nextjsServer = next({
dev: false,
conf: {
distDir: nextjsDistDir,
},
})
const nextjsHandle = nextjsServer.getRequestHandler()
exports.nextjsFunc = https.onRequest((req, res) => {
return nextjsServer.prepare().then(() => nextjsHandle(req, res))
})
5. firebase.json を追加する
vi firebase.json
{
"hosting": {
"public": "public",
"ignore": ["firebase.json", "**/.*", "**/node_modules/**"],
"rewrites": [
{
"source": "**",
"function": "nextjsFunc"
}
]
},
"functions": {
"source": ".",
"predeploy": [
"npm --prefix \"$PROJECT_DIR\" install",
"npm --prefix \"$PROJECT_DIR\" run build"
],
"runtime": "nodejs16"
},
"emulators": {
"functions": {
"port": 5001
},
"hosting": {
"port": 5002
},
"ui": {
"enabled": true
},
"singleProjectMode": true
}
}
6. ローカル(エミュレーター)で起動する
npm run serve
7. firebase console から設定を変更する
・プランを Blaze にアップグレードする
・Firebase Hosting を開始する
8. firebase へ デプロイする
npm run deploy
9. HTTP Error: 403, Project '<プロジェクト名>' not found or permission denied. エラーとなる場合の対処法
Project ID が 正しくない可能性があります。以下のコマンドからプロジェクトIDを確認します。
firebase projects:list
プロジェクトIDが間違っている場合は、次のファイル内のプロジェクトIDを正しいものに書き変えます。 .firebaserc
テンプレートを使ってNext.js を Firebase Hosting へデプロイする ( SSR は Firebase Functionsへ )
● 1. テンプレートを使って「Next.js を Firebase Hosting へ手動デプロイ」の練習をする
なお、SSR は Firebase Functions としてデプロイされるのでSSR可能です。
1. アプリの作成
例: アプリ名 my-test-hosting-app としています
npx create-next-app@latest --use-npm --example with-firebase-hosting my-test-hosting-app
2. Firebase のコンソールから 新規プロジェクトを作成
プロジェクト名はアプリ名と同じ my-test-hosting-app とするとわかりやすいです。 プロジェクト名はコピーしてクリップボードに保存しておきます
3. firebase cli からログイン
アプリのルートディレクトリに移動して、そこからコマンドでログインします。(間違いがないように先にログアウトしておきます)
firebase logout
firebase login
.firebaserc を変更する
{
"projects": {
"default": "先ほど保存したプロジェクト名をここにペースト"
}
}
プロジェクト名をコピーし、忘れた時は、次のコマンドで一覧を表示させて、そこからコピーします
firebase projects:list
4. ローカルのテスト
firebase.json
ポートを 5002番に変更します
emlators を追加します
{
"hosting": {
........
} ,
"functions": {
........
} ,
"emulators": {
"functions": {
"port": 5001
},
"hosting": {
"port": 5002
},
"ui": {
"enabled": true
},
"singleProjectMode": true
}
}
package.json には
"serve": "npm run build && firebase emulators:start --only functions,hosting",
があるので このスクリプトを実行します。
npm run serve
5.ローカルサーバーへアクセスします
アプリ(ローカル)
http://localhost:5002/
firebase コンソール(ローカル)
http://localhost:4000/
6. 本番サーバ ( Firebase Hosting ) へデプロイする
functions の node.js のバージョンを16に設定します
firebase.json
"functions": {
........
"runtime": "nodejs16"
},
npm run deploy
● 2. githubへ mainブランチを push したときに自動で Firebase にデプロイする設定を追加する
Firebase のシークレットを githubへ登録する
(シークレットの登録)1. Firebase コンソールからサービスアカウントの作成
Firebase コンソールの歯車アイコン → プロジェクトの設定 → サービスアカウント → 新しい秘密鍵の生成
で秘密鍵をダウンロードします。
(シークレットの登録)2. Githubへサービスアカウントの登録
Githubでアプリのリポジトリへ移動 → settings → Secrets and variables → Actions →「New repository secret」
Name : FIREBASE_SERVICE_ACCOUNT_<FirebaseプロジェクトIDを大文字で。>
Secret : ダウンロードした秘密鍵のJSONを貼り付ける
(シークレットの登録)3. Githubで Workflow の Permission を変更する
Githubでアプリのリポジトリへ移動 → Settings → Actionsの中のGeneral → General → Workflow permissions を以下の画像のように設定する
GitHub CLI のインストール
brew install gh
secretsの確認
gh secret list
vi .github/workflow/firebase-hosting-merge.yml
)
firebase hosting
● Firebase CLI ( firebase-tools ) のインストール
npm install -g firebase-tools
firebase --version
firebase アカウントが既にある場合は一度ログアウトしてからログインしなおすと良いです
firebase logout
firebase login
firebase init hosting
アプリのディレクトリに移動してFirebaseをインストールする
npm install firebase
● (Next.js App Router)のコンポーネントが 「サーバー」/「クライアント」どちらかのみで動作することを限定する
● server-only コンポーネントのインストール
npm i server-only
● サーバーサイドのみに限定する
import "server-only";
を 先頭に記述します。 これをクライアントで描画すると以下のようなエラーがスローされます。
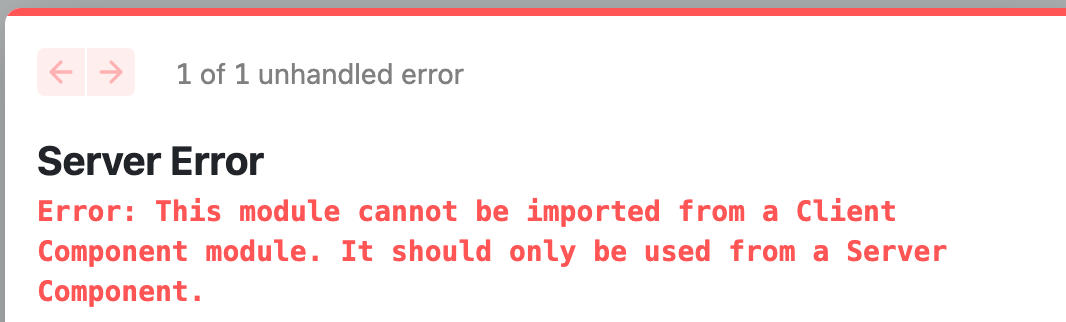
● クライアントサイドのみに限定する
(サーバーサイドで実行された時にエラーがスローされます)
import "client-only";
)
Next.js で 多言語
● A. ディレクトリで 言語ごとに分ける方法
/ja/ または ロケールなし の場合は 日本語
/en/ の場合は 英語
とするには以下のように記述します
next.config.js
/** @type {import('next').NextConfig} */
const nextConfig = {
reactStrictMode: true,
i18n: {
locales: ["en", "ja"],
defaultLocale: "ja",
},
};
module.exports = nextConfig;
これで
http://localhost:3000/login の場合は日本語
http://localhost:3000/ja/login の場合は日本語
http://localhost:3000/en/login の場合は英語
となります。
● コンポーネントでロケールを取得する
import { usePathname } from 'next/navigation';
const getLocale = (path: string): string => {
if (path.match(/^\/en/)) return 'en';
return 'ja';
};
const pathname = usePathname();
const locale = getLocale(pathname);
● i18nで使用するロケールの表の仕様はどうやって決まっているのですか?
i18nにおけるロケールの表は、主にISO 639言語コードとISO 3166国コードに基づいて決定されます。
ISO 639言語コードは、言語を識別するための2〜3文字のコードです。たとえば、英語のISO 639コードは "en" であり、日本語のISO 639コードは "ja" です。
一方、ISO 3166国コードは、国または地域を識別するための2文字または3文字のコードです。たとえば、アメリカ合衆国のISO 3166コードは "US" であり、日本のISO 3166コードは "JP" です。
これらのコードを組み合わせることで、i18nのロケールコードが形成されます。たとえば、英語を話すアメリカ人のためのロケールは、"en_US"と表記されます。同様に、日本語を話す日本人のためのロケールは、"ja_JP"と表記されます。
ただし、ISO規格以外のロケールコードも存在する場合があります。それらは、一般的な業界規格、アプリケーション固有の規則、あるいは地域の文化的および言語的な違いに基づくものがあります。
next.js (pages router) で 現在のURLパス、クエリパラメーターを取得する
● next.js で 現在のURLパスを取得する
・/docs/[id]/ で取得する場合
import { useRouter } from "next/router";
const { pathname } = useRouter()
・/docs/123456/ で取得する場合
import { useRouter } from "next/router";
const { asPath } = useRouter()
・/docs/[id]/ で定義したルートに 現在 /docs/123456/ でアクセスしているときのIDの取得方法
import { useRouter } from 'next/router';
const router = useRouter();
const docId = router.query.id; // 123456
● getServerSideProps() にてURLクエリパラメーターを取得する
http://localhost:3002/test?page=12
/pages/ 内の .tsx ファイルのgetServerSideProps()にてURLパラメーターを取得する方法です。 これだと props で コンポーネントに渡されるので router.isReady を待つ必要がありません。
/src/pages/test.tsx
import { MyComponent } from '@/components/MyComponent';
import { GetServerSidePropsContext, NextPage } from 'next';
interface Props {
page: number;
}
export async function getServerSideProps(context: GetServerSidePropsContext):Promise<{props:Props}> {
const { page: queryPage } = context.query;
const page = queryPage ? Number(queryPage) : 999;
return {
props: {
page,
},
};
}
const Test: NextPage<Props> = (props ) => {
return (
<>
<h1>Hello Test</h1>
<h5>{props.page}</h5>
<MyComponent page={props.page} />
</>
);
};
export default Test;
next.js の アプリをサブディレクトリで動作させる
● nginxの設定ファイル
location /app/ {
proxy_pass http://localhost:3000/;
}
● next.config.js
assetPrefix を追加します
const SUB_DIRECTORY = "/app";
const isProduction = process.env.NODE_ENV === "production";
/** @type {import('next').NextConfig} */
const nextConfig = {
assetPrefix: isProduction ? SUB_DIRECTORY : "/" ,
reactStrictMode: true,
swcMinify: true,
};
module.exports = nextConfig;
next.js の ルートURL を変更する
● Next.jsでURLのルートを変更する
next.config.js
module.exports = {
assetPrefix: '/hoge'
};
● run dev / run build で自動的にセットされる NODE_ENV を使用して設定を分ける場合
next.config.js
const isProduction = process.env.NODE_ENV === "production";
module.exports = {
assetPrefix: isProduction ? '/app' : '/'
};
next.js で cypress の E2Eテスト
● nextjsアプリと cypress のインストール
npx create-next-app@latest --ts cypress-testing-app
cd cypress-testing-app
npm install cypress --save-dev
npm install @testing-library/cypress --save-dev
package.json に以下を追加
"scripts": {
......
"cy:open": "cypress open",
"cy:run": "cypress run"
},
● nextjsアプリの実行
あらかじめ実行しておきます
npm run dev
● cypressの起動
最初に一度起動します
npm run cy:run
● テストスクリプトを追加
cypress\e2e\0-my-tests\0-my-sample.cy.js
describe('example to-do app', () => {
it('ルートパスに訪問できるか', () => {
cy.visit('http://localhost:3000/')
})
})
● テストを実行(GUI)
npm run cy:open
● テストを実行(CUI)
npm run cy:run
nextjs middleware
middlewareはサーバサイドです
/src/middleware.ts
import { NextRequest, NextResponse } from 'next/server';
const isClient = () => typeof window !== 'undefined';
export const middleware = (req: NextRequest) => {
console.log('isClient ?');
console.log(isClient());
return NextResponse.next();
};
Next.js で 画面遷移、1つ前の履歴に戻る
● 1. Link を使用する
import Link from 'next/link'
Next.js version 13以降
<Link href="/about">About Us</Link>
Next.js version 12以前
<Link href="/about"><a>About Us</a></Link>
● 2. onClick など、メソッドで画面遷移したい場合は 「useRouter」または「Router」を使用する
useRouter を使用する(こちらがおすすめです)
import { useRouter } from 'next/router';
const router = useRouter();
if (router.isReady) {
router.push({
pathname: '/login',
query: { returnUrl: router.asPath }
})
}
Router
import Router from 'next/router';
Router.push('/home'); // '/home'へ遷移
・useRouter と Router の違い
useRouter は hooks なので、 実際にルーターのインスタンス を取得したときにre-render されるので以下のコードが正しく実行できます。 Routerの場合は まだインスタンスがないので実行できません。
○ OK
import { useRouter } from "next/router";
const router = useRouter();
if (router.isReady) {
router.push("/login");
}
× NG
import Router from "next/router";
if (Router.isReady) {
Router.push("/login");
}
● Next.js で 1つ前の履歴に戻る
<button onClick={() => router.back()}>
戻る
</button>
Next.js + SQLite
nextjsアプリの初期化
npx create-next-app@latest --ts sample-app
cd sample-app
パッケージのインストール
npm install --save typescript ts-node
npm install --save typeorm sqlite3
npm install sqlite3 --save
npm install reflect-metadata --save
npm install @types/node --save
yarn typeorm init --database sqlite3
ormconfig.json が 自動生成されますので、以下のように追記します。
"type": "sqlite",
"database": "data/dev.sqlite",
{
"type": "sqlite",
"database": "data/dev.sqlite",
"synchronize": true,
"logging": false,
"entities": [
"src/entity/**/*.ts"
],
"migrations": [
"src/migration/**/*.ts"
],
"subscribers": [
"src/subscriber/**/*.ts"
],
"cli": {
"entitiesDir": "src/entity",
"migrationsDir": "src/migration",
"subscribersDir": "src/subscriber"
}
}
テーブル Postを追加してみます
/src/entity/Post.ts
import {
Entity,
Column,
PrimaryGeneratedColumn,
CreateDateColumn,
UpdateDateColumn,
} from 'typeorm';
@Entity()
export class Post {
@PrimaryGeneratedColumn()
readonly id: number;
@Column('varchar', { length: 255, nullable: false })
name: string;
@Column('int', { nullable: true })
sort_no: string;
@CreateDateColumn()
readonly created_at?: Date;
@UpdateDateColumn()
readonly updated_at?: Date;
}
マイグレーションの実行
Windowsのターミナルから
node_modules\.bin\ts-node ./node_modules/typeorm/cli.js migration:generate -n Post
node_modules\.bin\ts-node ./node_modules/typeorm/cli.js migration:run
と実行します
https://www.wakuwakubank.com/posts/730-typeorm-custom-naming/
elastomer_appま
●マイグレーション
yarn typeorm init
1. DB接続の確認 と マイグレーションの確認
yarn ts-node node_modules/.bin/typeorm migration:show
2. マイグレーションファイルの自動生成
エンティティ Post の マイグレーションファイルを自動生成する
yarn ts-node node_modules/.bin/typeorm migration:generate -n Post
src/migration/1647220932735-Post.ts といった命名のファイルが自動生成されます
3. マイグレーションの実行
yarn ts-node node_modules/.bin/typeorm migration:run
Next.js での SSR回避方法3選 ( hydration error , document error 回避)
SSRで hydration error , document error が起きる原因
Next.jsはサーバーコンポーネントとクライアントコンポーネントの両方をサポートしています。
サーバーサイドレンダリング: コンポーネントがサーバー上でレンダリングされる際、
documentやwindowなどのブラウザ専用オブジェクトは存在しませんハイドレーション: サーバーでレンダリングされたHTMLがクライアントに送られた後、Reactがブラウザ上でコードを「ハイドレート」(活性化)する過程で、このエラーが発生しています
解決方法
- useEffect を使用する:
import { useEffect, useState } from 'react';
function MyComponent() {
const [mounted, setMounted] = useState(false);
useEffect(() => {
setMounted(true);
// ここで安全に document にアクセスできる
}, []);
if (!mounted) {
return null; // または初期表示用の代替表示
}
// document を使用するコード
return <div>...</div>;
}
- next/dynamic を使用したコンポーネントの動的インポート:
import dynamic from 'next/dynamic';
const ClientSideComponent = dynamic(
() => import('../components/ClientComponent'),
{ ssr: false } // サーバーサイドレンダリングを無効化
);
function Page() {
return <ClientSideComponent />;
}
- typeof window !== 'undefined' チェック:
function MyComponent() {
const isBrowser = typeof window !== 'undefined';
// document を使用するコードを条件付きで実行
return (
<div>
{isBrowser && /* document を使用するコード */}
</div>
);
}
- 'use client' ディレクティブを使用:
ファイルの先頭に
'use client'を追加すると、そのコンポーネントとその子コンポーネントはクライアントサイドでのみ実行されます。
'use client'
import { useEffect } from 'react';
export default function ClientComponent() {
useEffect(() => {
// ここで安全に document にアクセスできる
const element = document.getElementById('some-id');
// ...
}, []);
return <div>...</div>;
}
Next.jsではクライアントサイドの処理とサーバーサイドの処理を適切に分けることが重要です。document オブジェクトを使用する必要がある場合は、上記のいずれかの方法を使用して、そのコードがクライアントサイドでのみ実行されるようにしましょう。
● Next.js で dynamic import ( ssr: false ) による SSR回避(その1)
https://nextjs.org/docs/app/building-your-application/optimizing/lazy-loading
・export default の場合
import { MyComp } from "../components/MyComp";
↓
import dynamic from "next/dynamic";
const MyCompNoSSR = dynamic(() => import("./MyComp"), { ssr: false });
以上で、SSRが回避されます。
・named export の場合
import MyComp from "../components/MyComp";
↓
import dynamic from "next/dynamic";
const MyCompNoSSR = dynamic(
() => import("./MyComp").then((modules) => modules.MyComp),
{ ssr: false },
);
以上です。
● Next.js で dynamic import ( ssr: false ) による SSR回避(その2)
このように 呼び出されるコンポーネント側に記述することもできます
import App from '../components/App'
export default function About() {
return (
<App>
<p>About Page</p>
</App>
)
}
↓
import dynamic from 'next/dynamic'
import App from '../components/App'
const About = ()=> {
return (
<App>
<p>About Page</p>
</App>
)
}
export default dynamic(() => Promise.resolve(About), {
ssr: false
})
以上で、SSRが回避されます。
● SSR回避の確認方法
ページをリロードしてhtmlソースを見てみます。
<p>About Page</p>
がなければ、SSRされていません。
オプション With suspense
React18以上が必要です。必ずバージョンを確認しましょう
const DynamicLazyComponent = dynamic(() => import('../components/hello4'), {
suspense: true,
})
https://nextjs.org/docs/advanced-features/dynamic-import
npm run dev の時だけ htmlソースを表示した時にエラーが出ることがあるようです
Next.js アプリの初期化
● Next.js アプリの初期化(JavaScript)
npx create-next-app@latest my-app
● Next.js アプリの初期化(TypeScript)
npx create-next-app@latest --ts my-app
NEXT JS アプリのビルドを高速化させるターボパックを追加するには with-turbopack オプションを追加します
npx create-next-app@latest my-app --ts with-turbopack
turbopack でビルドを行うには次のコマンドを実行します
next dev --turbo
● Next.js アプリの初期化(JavaScript + TailWind CSS を追加)
npx create-next-app -e with-tailwindcss my-project
-e オプションはこちらのリポジトリからデータを持ってきます https://github.com/vercel/next.js/tree/master/examples
● Next.js アプリの初期化(TypeScript + TailWind CSS を追加)
公式のリポジトリにサンプルがないためまずTypeScriptでアプリを作成してその後にTailWindを追加します
・1. Next.js アプリの初期化(TypeScript)
npx create-next-app@latest --ts my-app
・2. TailWindのインストールと設定ファイルの初期化
cd my-app
npm install -D tailwindcss@latest postcss@latest autoprefixer@latest
npx tailwindcss init -p
・3. tailwind.config.js に mode と purge を追記する
module.exports = {
mode: 'jit',
purge: ['./pages/**/*.{js,ts,jsx,tsx}', './components/**/*.{js,ts,jsx,tsx}'],
darkMode: false, // or 'media' or 'class'
theme: {
extend: {},
},
variants: {
extend: {},
},
plugins: [],
}
・4. tailwindを _app.ts から読み込む
import 'tailwindcss/tailwind.css';
・5. index.tsx の JSXを試しに以下のようにする
return (
<div className="text-red-500 text-4xl sm:text-6xl lg:text-7xl leading-none font-extrabold tracking-tight mt-10 mb-8 sm:mt-14 sm:mb-10">テストです</div>
)
● VS Code の IntelliSense for CSS class names in HTML が重い場合
IntelliSense for CSS class names in HTML を無効にしましょう
Next. js で getLayout パターンで 共通のレイアウトページを作成する
● Next. js でgetLayout パターンで共通のレイアウトページを作成する
1. _app.tsx を変更する
変更前の _app.tsx
import '@/styles/globals.css'
import type { AppProps } from 'next/app'
export default function App({ Component, pageProps }: AppProps) {
return <Component {...pageProps} />
}
↓ 変更後の _app.tsx
import "@/styles/globals.css";
import { ReactElement, ReactNode } from "react";
import { NextPage } from "next";
import type { AppProps } from "next/app";
type NextPageWithLayout = NextPage & {
getLayout?: (page: ReactElement) => ReactNode;
};
type AppPropsWithLayout = AppProps & {
Component: NextPageWithLayout;
};
export default function App({ Component, pageProps }: AppPropsWithLayout) {
const getLayout =
Component.getLayout ||
((page) => {
return page;
});
return getLayout(<Component {...pageProps} />);
}
2 . 共通レイアウト Layout.tsx の作成
メインの children のところが各ページ内容に置き換わります
mkdir components
vi components/Layout.tsx
components/Layout.tsx
import React from "react";
interface Props {
children?: React.ReactNode;
}
const SimpleLayout: React.FC<Props> = ({ children }: Props) => {
return (
<>
<h1>header</h1>
{/* ===== メイン ===== */}
<main>{children}</main>
{/* ===== /メイン ===== */}
<h1>footer</h1>
</>
);
};
export default SimpleLayout;
3 . レイアウトを各ページへ適用
変更前の src/pages/mypage/index.tsx
import { Mypage } from '@/features/mypage/Mypage'
import LoggedInLayout from '@/layouts/LoggedInLayout'
import { ReactNode } from 'react'
import { NextPageWithLayout } from '@/pages/_app'
const PagesMypage: NextPageWithLayout = () => {
return <Mypage />
}
PagesMypage.getLayout = (page: ReactNode) => {
return <LoggedInLayout>{page}</LoggedInLayout>
}
export default PagesMypage
Next.js で 環境ごとに 設定ファイル(.env.development , .env.production)をわける
● Next.js の 環境設定ファイル(.env)
使うのは以下の2ファイルに限定すると良いでしょう。
.env.development : 開発用ファイル
NODE_ENV が development ( = npm run dev )の時に読み込まれる。
.env.production : 本番用ファイル
NODE_ENV が production ( = npm run build && npm run start )の時に読み込まれる。
● .envファイルの書き方と呼び出し方
書き方(サーバーサイド)
( .env.development または .env.production)
HOGE=mySettingValue
呼び出し方(サーバーサイド)
( xxx.js や xxx.ts ファイル )
console.log( process.env.HOGE );
書き方(フロントエンド)
( .env.development または .env.production)
NEXT_PUBLIC_HOGE=mySettingValue
呼び出し方(フロントエンド)
( xxx.js や xxx.ts ファイル )
console.log( process.env. NEXT_PUBLIC_HOGE );
● 現在「開発用」か「本番用」かどちらが読み込まれているのかをチェックする
NODE_ENV で判断すると良いでしょう
console.log( process.env.NODE_ENV );
● 現在「サーバーサイド」か「フロントエンド」かを判別する
typeof window === "undefined"
windowオブジェクトがないのがサーバーサイド
windowオブジェクトがあるのがフロントエンド
です。
デバッグ用にサーバーがクライアントを返したい場合はメソッドにしておいても良いかもです
export default function ServerOfClient() {
return (typeof window === "undefined") ? 'Server' : 'Client';
}
Booleanの場合はそのまま利用しても良いですし以下のようにしても良いです
const isProduction = process.env.NODE_ENV === "production";
● envの値を確認するサンプル
console.error(`● process.env.APOLLO_FETCH_POLICY は (${process.env.APOLLO_FETCH_POLICY}) / NODE_ENVは(${process.env.NODE_ENV}) / Server or Client は(${ServerOfClient()})`);
結果例
● process.env.APOLLO_FETCH_POLICY は (network-only-S) / NODE_ENVは(development) / Server or Client は(Server)
● .envファイルを書き換えたのに値が更新されない時は?
control + c でいちどプロセスを終了してから再度起動します
npm run dev